Latest News
Maximizing ZimaBoard Potential & A Comprehensive Guide to ZFS Installation by Tyrehl
![]() John Guan - Nov 28, 2023
John Guan - Nov 28, 2023
Greetings ZimaBoard enthusiasts! Today, we’re delighted to bring you a comprehensive tutorial by our dedicated community member, Tyrehl. Not only does Tyrehl expertly guide you through the installation process of ZFS on ZimaBoard, but they also provide a holistic overview of ZimaBoard itself.
From community insights to detailed installation instructions, Tyrehl’s article is your one-stop resource for unlocking the full potential of both ZFS and ZimaBoard. Our heartfelt thanks go out to Tyrehl for this enriching contribution, bridging the gap between community engagement and technical know-how. Let’s embark on this journey together and elevate your ZimaBoard experience. Happy exploring!
Introduction
Single-board computers (SBCs) are really popular in home lab scenarios, and in the last years they have made ground in professional settings and in the industry as well. Nowadays there is a large ecosystem centered around edge computing and small form-factor systems.
Decent compute is easy to get, with various SBCs offering 4 cores and plenty of ram for various applications. Where they usually fall short is on the storage front. SD cards and Flash storage in general is generally slow, and prone to failure in write-heavy scenarios. Disks attached over USB do not offer the same amount of reliability, and picking a good USB-to-SATA connector is not trivial either.
The ZimaBoard has an ace up its sleeve. Two SATA ports, the dual 100/1000 Ethernet, and various PCIe extension options, make for a very flexible system.
Where are the limits of what an SBC can realistically achieve, and why is storage always such a pain? Where is the golden middle between a compact machine, which does not master any task particularly well, and a cable salad monster with 6 SATA disks requiring an an external ATX PSU?
This article aims to explore the strengths of the ZimaBoard, and how they can be exploited in order to put it to good use. Without ending up with a silly looking and impractical setup.
Motivation
As mentioned previously, lots of compute is easy to deploy and utilize. Memory is cheap too, so storage quickly becomes the limiting factor. Anyone who has had to deal with infrastructure is probably aware of this. Just take a look at the k8s network storage options, the various platforms claiming to bring S3-compatible APIs to your cluster, and how annoying they are to deploy and properly operate.
The ZimaBoard, with its excellent I/O capabilities, is a great candidate for a small form factor NAS or a general purpose server with resilient local storage. And here lies the challenge – how do we provide fault tolerant storage in a small form-factor package, on a platform which “just works”, and is operationally boring.
On the hardware side, we will restrict ourselves to running with just two 2.5 inch disks off the power and SATA connectors on the back of the ZimaBoard. This makes for a very compact solution without the necessity for an external power supply and extension cards.
Less is more
Deploying a ton of storage is good, but having fault-tolerant storage is even better. For that we need a more advanced file system offering storage redundancy.
ZFS offers software RAID capabilities surpassing these of most hardware RAID controllers. It is a truly excellent file system with many other notable features like incremental snapshots, syncing between remote systems and storage pools, and encryption.
The focus today is purely on running the disks redundantly.Normally ZFS is used to manage a RAIDZ array. But since we have limited ourselves to two disks, this leaves only one relevant option – the ZFS mirror pool. This will effectively halve the storage capacity, but at the same time it will provide us with better redundancy, and the ability to shrug off a single disk failure. Not ideal, but it will have to do.
Hardware
Disks
Generally, the ZimaBoard community recommends users to stick to 2.5 inch disks. Their main advantage is that they do not need a 12V rail in order to operate. There are reports of successful tests with 3.5 inch disks, so YMMV. In my case, I opted for two 1TB SSDs. You can pick HDDs as well, if you need more capacity.
Connectors and 3D Printed Accessories
The official Y-Splitter is strongly recommended for connecting and powering the two disks. There are workarounds, like using USB-to-Sata power adapters. This looks ugly, but it will work.To keep everything together, a 3D-printed dual HDD stand works great. The end result is a very portable and low profile package.
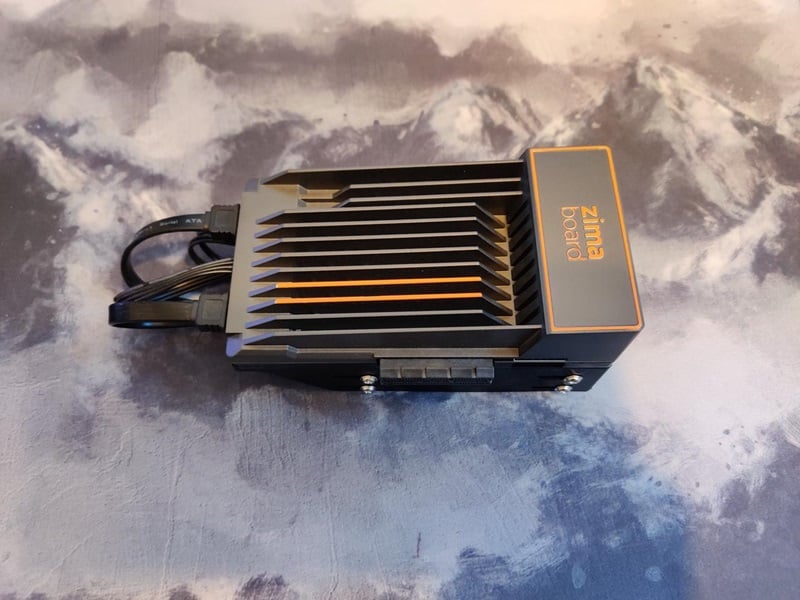
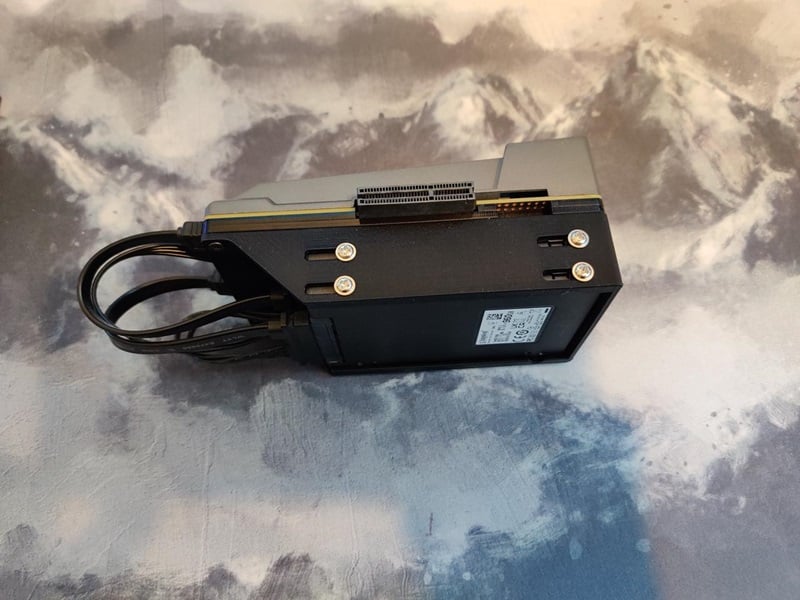
Links are included at the end of the article. I found this version to be very compact and practical due to the small size. There also exist various 3D-printed plates for rack mounting, if you have the space for it.
Installing ZFS
The ZimaBoard ships with Debian by default. This is also my personal recommendation for a solid distro which won’t get in the way or surprise you. For other distributions consult with the respective documentation and ZFS installation instructions.
Before starting, remember to update to the latest LTS release if you can. Back up your data so it is easy to tear things down and start over. And document every step, so troubleshooting is easier. Look into the script command for a convenient way to do this.
Detailed instructions and advanced use cases are documented at https://wiki.debian.org/ZFS this is the recommended primary source for setting up ZFS.
Pre-Reqs
Make sure that HTTPS repositories can be accessed:
1 apt install -y lsb-release apt-transport-https
Add the Backports repo for your release by editing /etc/apt/sources.list or add a new sources file under ‘/etc/apt/sources.list.d/’:
1 #determine codename or manually replace below:
2 codename=$(lsb_release -cs)
3 #add backports repo to sources list:
4 echo “deb http://deb.debian.org/debian $codename-backports main contrib non-free”|sudo tee /etc/apt/sources.list.d/debian_backports.list && sudo apt update
ZFS Packages
Finally, as per the Debian documentation, install the latest Linux headers and the relevant ZFS packages:
1 sudo apt install linux-headers-amd64;sudo apt install -t $codename-backports zfsutils-linux zfs-dkms
“Oh no – something went wrong”
Failure to install ZFS can be usually traced back to an old or incorrect kernel, or missing headers. It is best to purge all ZFS-related packages, check the installed headers, and reread the installation documentation.
1 sudo dpkg -l | egrep ‘linux-image|linux-headers’
Creating a pool and a filesystem
List disks by IDs:
1 ls -l /dev/disk/by-id/
2 ls -l /dev/disk/by-id/
3 lrwxrwxrwx 1 root root 9 Dec 22 15:29 ata-KINGSTON_SA400S37960G_50026B73818333D1 -> ../../sdb
lrwxrwxrwx 1 root root 9 Dec 22 15:29 ata-KINGSTON_SA400S37960G_50026B73818333DB -> ../../sda
4 lrwxrwxrwx 1
And create a pool by specifying the stable device IDs, e.g.:
1 zpool create $mirror_pool_name mirror ata-KINGSTON_SA400S37960G_50026B73818333D1 ata-KINGSTON_SA400S37960G_50026B73818333DB
Create an encrypted file system:
1 zfs create \
2 -o encryption=on \ # remove if unnecessary
3 -o keyformat=passphrase -o casesensitivity=mixed \
4 -o acltype=posixacl -o xattr=sa -o dnodesize=auto $mirror_pool_name/$dataset_name
Real world usage scenarios and performance
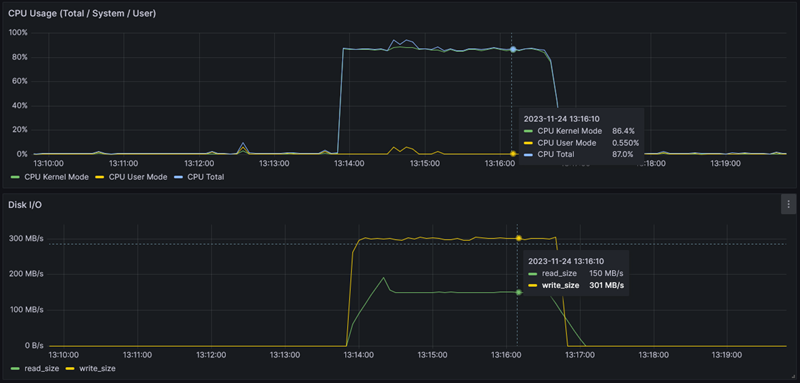
ZimaBoard does not have any issues running ZFS, and has plenty of performance with only encryption hurting CPU usage noticeably. Transcoding and streaming (e.g. with Jellyfin) is not a problem either.It is worth noting, that reading or writing very large files to an encrypted file system will heavily tax the CPU. This might impact other workloads running on the system.
SMB/NFS
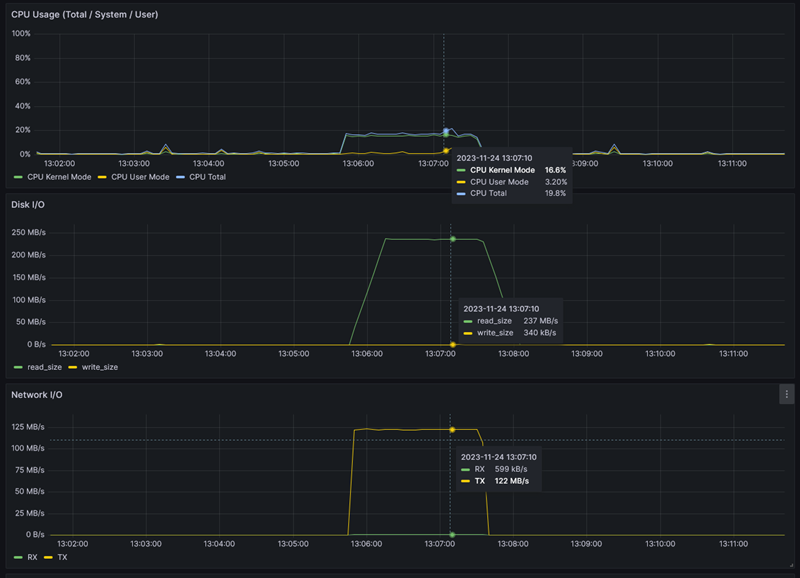
During general testing, writing a single 12GB file to the ZFS mirror pool took around 5 minutes, disk IO being the bottleneck. Reading off the ZFS pool was much faster, taking less than half as long. Effectively, the 1Gbps network connection was completely maxed out.Both tests were done to / from an unencrypted file system:
The next test showcases the heavy impact encrypting has on the CPU. The same 12GB file was read to from the unencrypted ZFS file system, and written to an encrypted one. Performance is still excellent, but the CPU usage spiked and remained very high throughout the process.
Resources and references
- ZFS Installation on Debian: https://wiki.debian.org/ZFS#Installation
- https://www.printables.com/model/224057-zimaboard-dual-hdd-stand
- SATA Y-Cable: https://shop.zimaboard.com/products/sata-y-cable-for-zimaboard-2-5-inch-hdd-3-5-inch-hdd-raid-free-nas-unraid
Conclusion
Got questions or seeking further clarification on any aspect of the tutorial? Tyrehl is here to help! Join our Discord community to connect with Tyrehl directly and engage in insightful discussions. Your curiosity doesn’t have to stop with the tutorial – Tyrehl is ready to assist you on your ZFS journey.Join our Discord server: [ zimaboard.com/discord]
