1. Overview
This tutorial guides you through deploying OpenClaw on a device running CasaOS/ZimaOS, completing the basic configuration, and enabling AI model interaction via Telegram. Using a Telegram bot as the example, this tutorial covers the entire process from model provider setup to bot pairing.
1.1 Goals
Complete the initial OpenClaw setup, including:
Connecting a custom AI model provider
Creating and linking a Telegram bot to enable AI chat via direct messages
Viewing and managing OpenClaw status through the Web UI
1.2 Environment
Recommended Hardware Specifications:
- 4 GB RAM
- 20 GB Storage
Software:CasaOS v0.4.15 / ZimaOS v1.5.4 (latest)
Network:Must The device must be connected to the internet and able to reach the Telegram API. A wired connection is recommended for stability.
1.3 Usage Notes
Continuous Operation: OpenClaw is designed to run 24/7. Place your ZimaBlade in a well-ventilated area with a stable ambient temperature to ensure reliable long-term performance and prevent thermal throttling.
Storage Expansion: The ZimaBlade’s built-in storage is limited. If you plan to use memory or logging features extensively, it is strongly recommended to attach an external drive for storing conversation history and application data.
1.3 Prerequisites
Your device’s IP address, used to replace the
<ip>placeholder in commands.See Step 3 at https://www.zimaspace.com/docs/zimaboard/Power-on-Zimablade for how to find it.
An AI model API Key and basic familiarity with how to use it.
A Telegram account.
Note: In the OpenClaw configuration interface, use the Space bar to select an option and Enter to confirm.
1.4 Steps at a Glance
Install OpenClaw from the CasaOS / ZimaOS App Store.
Open a terminal — connect via SSH (recommended) or use the terminal.
Switch to administrator mode: run
suand enter the default passwordcasaos.Enter the OpenClaw container:
docker exec -it openclaw bashLaunch the configuration wizard:
node /app/dist/index.js configConfigure the model provider: select Model, choose custom provider, then enter the Base URL, API Key, and model ID.
Configure the Telegram channel: select Channels → Configure/link → Telegram, create a bot via BotFather, enter the Token, and set the DM policy to Pairing (recommended).
Complete pairing: send
/startto your bot in Telegram to receive a pairing code, then runopenclaw pairing approve telegram <pairing-code>in the terminal.Access the Web UI at
https://<ip>:24190?token=casaos.
2. Detailed Steps (CasaOs Example)
2.1 Open a Terminal
After installing OpenClaw via the CasaOS Web UI, open a terminal to begin configuration. There are two ways to do this:
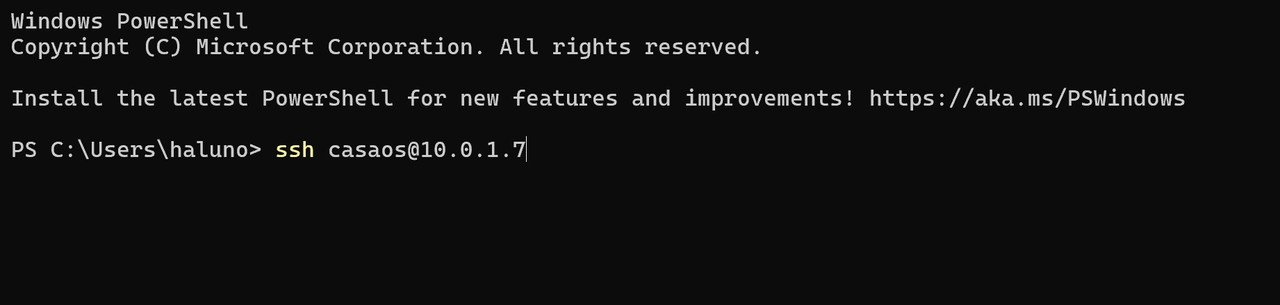
A. SSH from your computer (recommended — easier to copy and paste commands)
Please open the Terminal.
Run the following command:
ssh <username>@<ip> |
For example: ssh [email protected]
If this is your first time connecting, you will see the prompt:
Are you sure you want to continue connecting (yes/no)? |
Type yes and press Enter.
B. Input directly on ZimaBlade
Connect a keyboard and monitor directly to the ZimaBlade and use the local terminal.
2.2 Switch to Administrator Mode
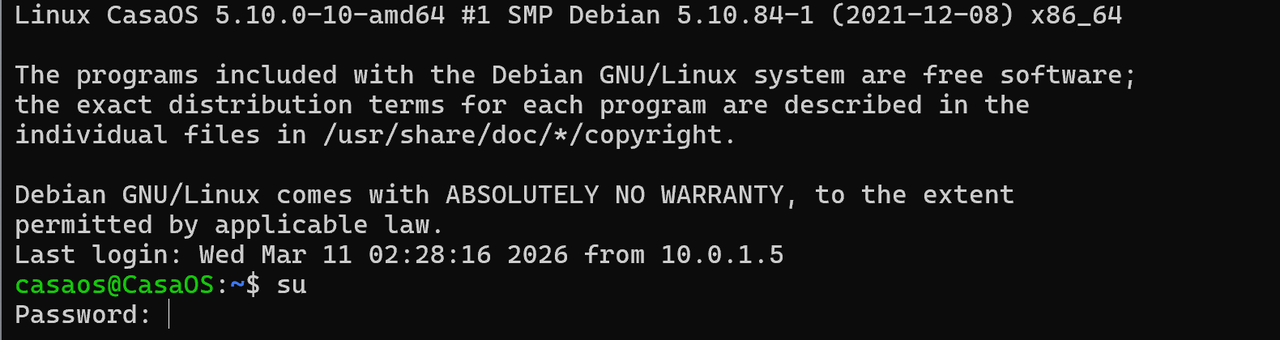
Run the following command and press Enter:
su |
Enter the default password casaos.
The password will not be displayed as you type — this is normal.
If you are using ZimaOS, no password is required.
You now have the administrator privileges required to modify system settings.
2.3 Enter the Configuration Wizard
Step 1 — Enter the OpenClaw container:
docker exec -it openclaw bash |

When the prompt changes to root@openclaw:/app, you have successfully entered the container. All subsequent configuration must be performed from within this container. If you accidentally exit, simply run this command again.
Step 2 — Launch the configuration wizard:
node /app/dist/index.js config |
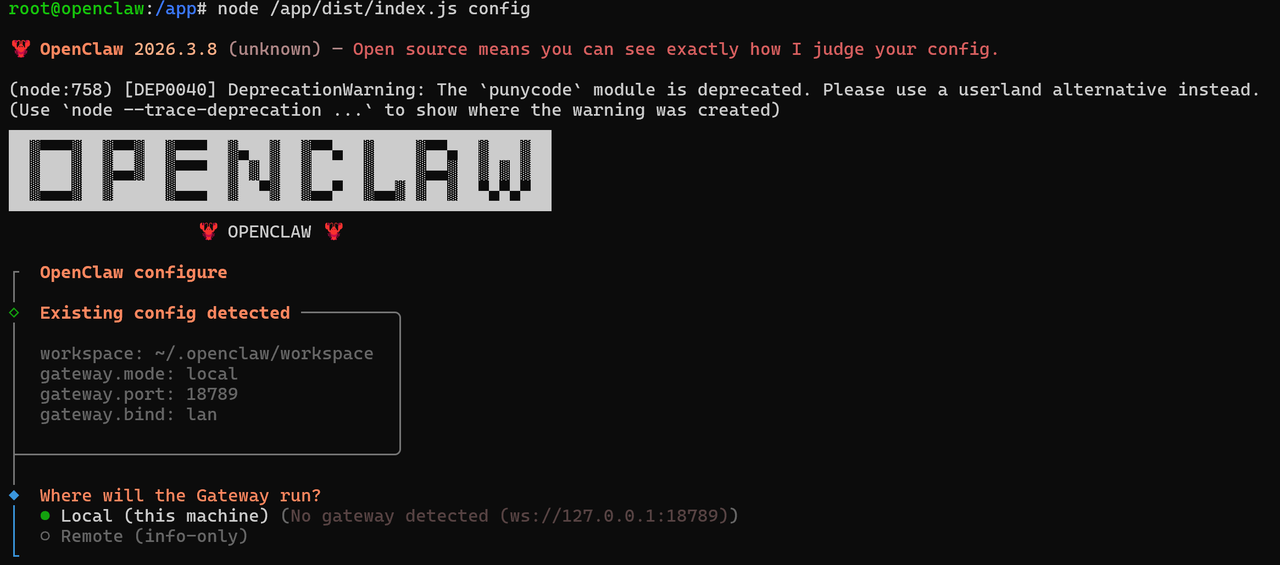
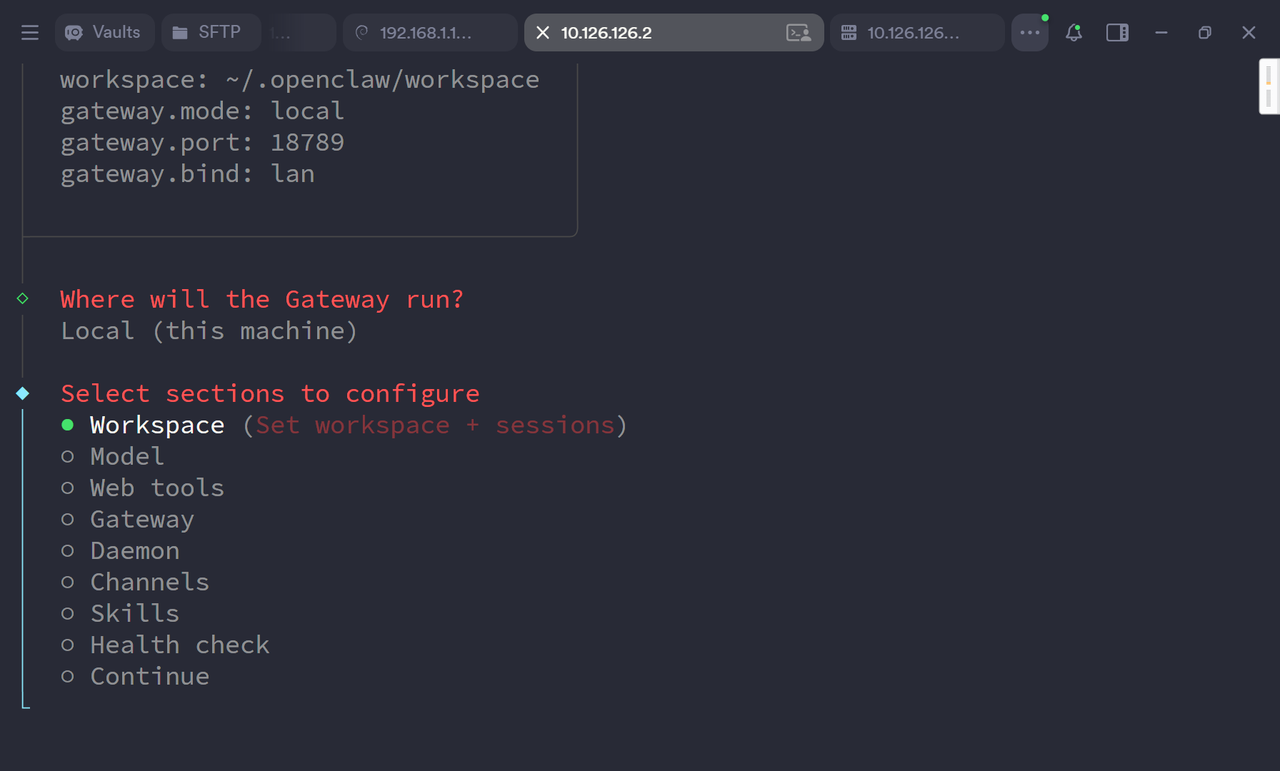
Step 3 — Select the Gateway location:
When prompted with Where will the Gateway run?, select Local (this machine).
The highlighted option is the currently selected one. Press Enter to confirm.
2.4 Configure the Model
1. Select a Provider
In Select sections to configure, choose Model.
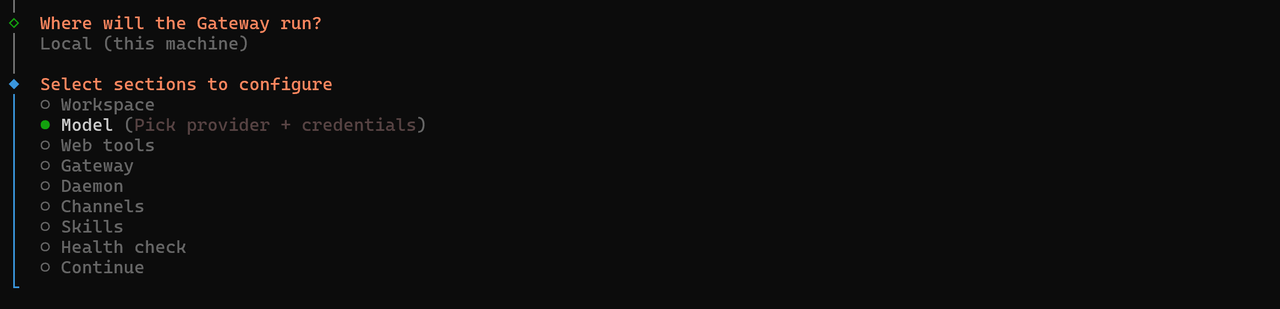
In Model / auth provider, select custom provider.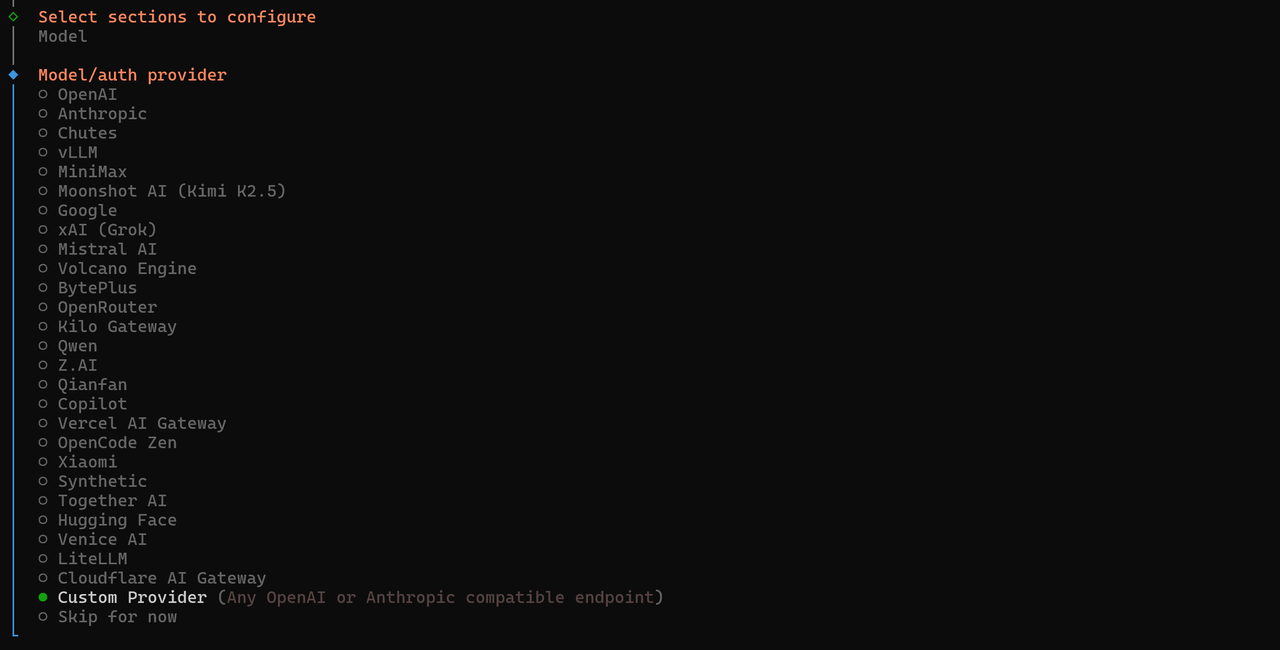
2. Enter Model Parameters
Enter the Base URL (e.g., https://api.openai.com/v1).
Enter your API Key.

Select the API format.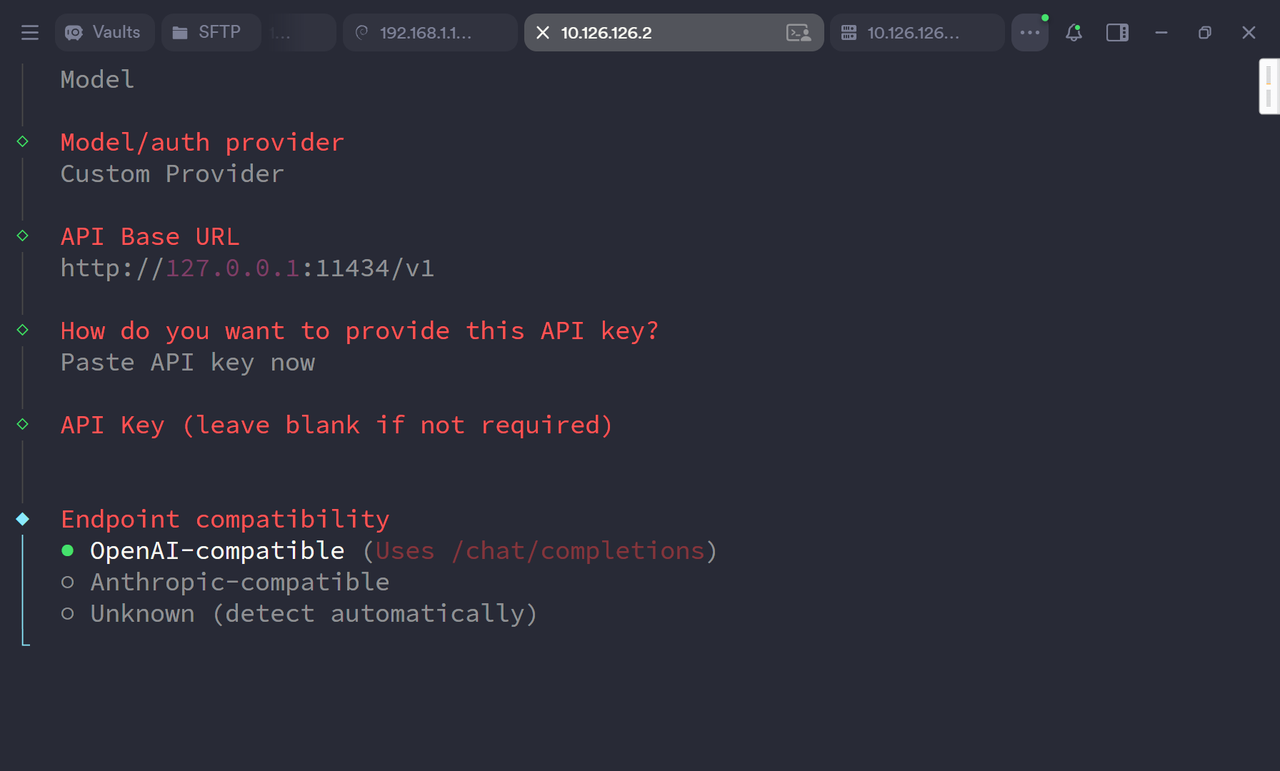
Select the Model ID you want to use.
2.5 Configure a Channel (Telegram Example)
1. Open Channel Settings
In Select sections to configure, choose Channels.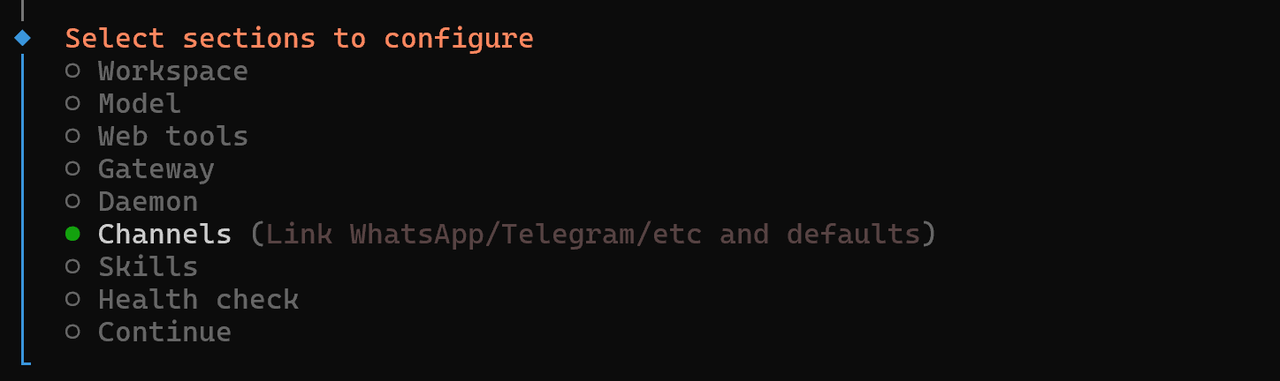
Select Configure / link.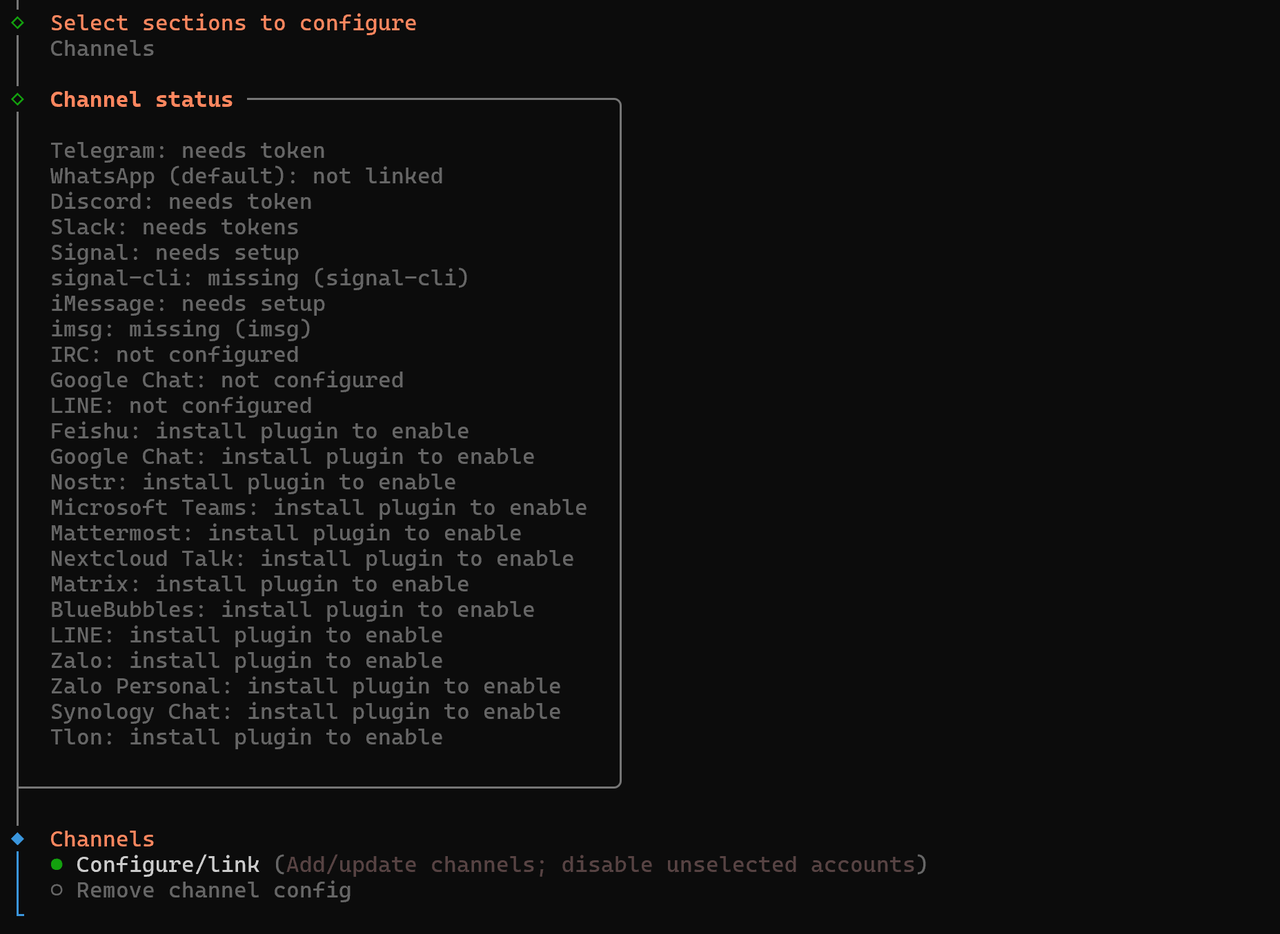
Select Telegram from the list.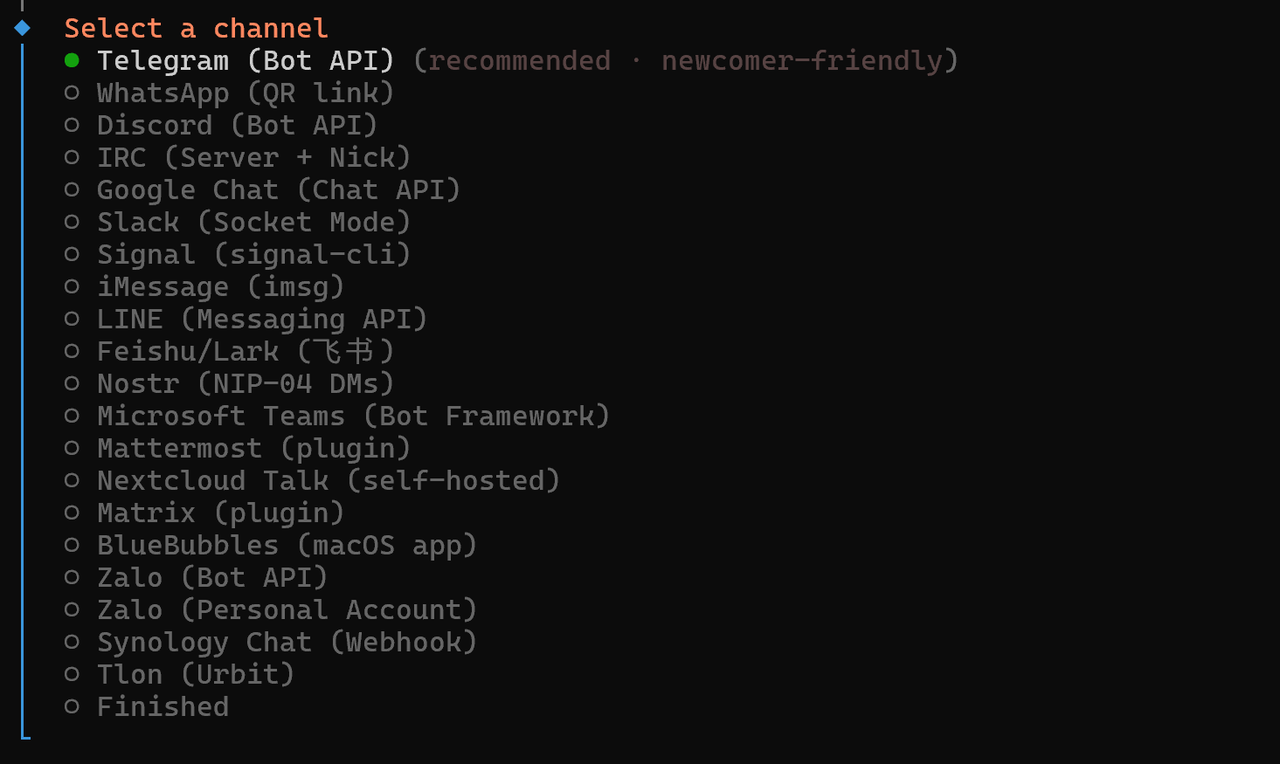
2. Get a Bot Token
Open a conversation with @BotFather on Telegram and send /newbot to start creating a bot.
BotFather will ask you to provide:
Bot Name: The display name for your bot
Username: A unique handle that must end inbot
Once created, BotFather will return an HTTP API Token
Save this Token — you will need it in the next step.
3. Enter the Bot Token
Select Enter Telegram bot token.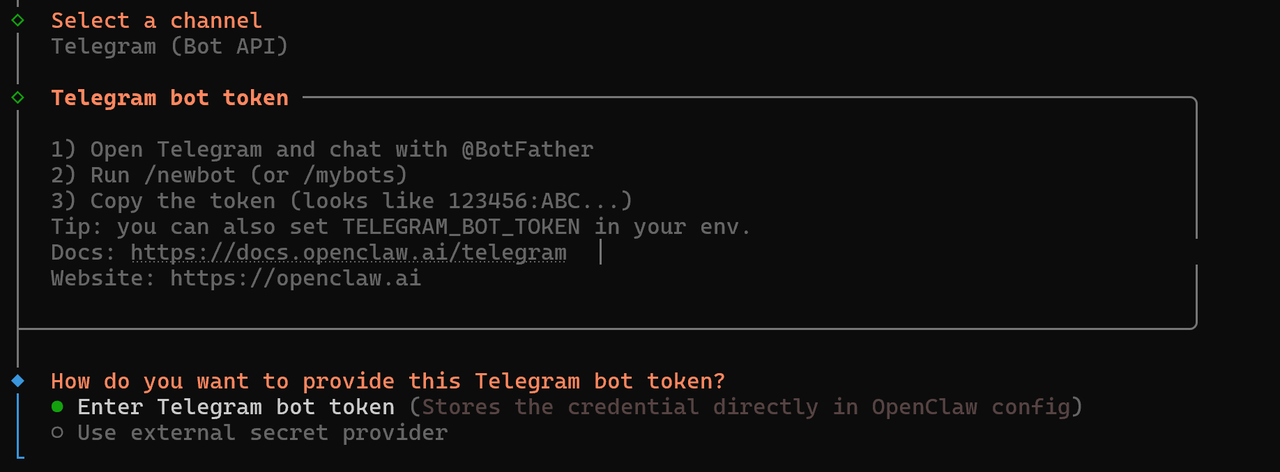
Paste or type the Token you received from BotFather.

4. Set the DM Access Policy
When asked Configure DM access policies now? (default: pairing), select Yes.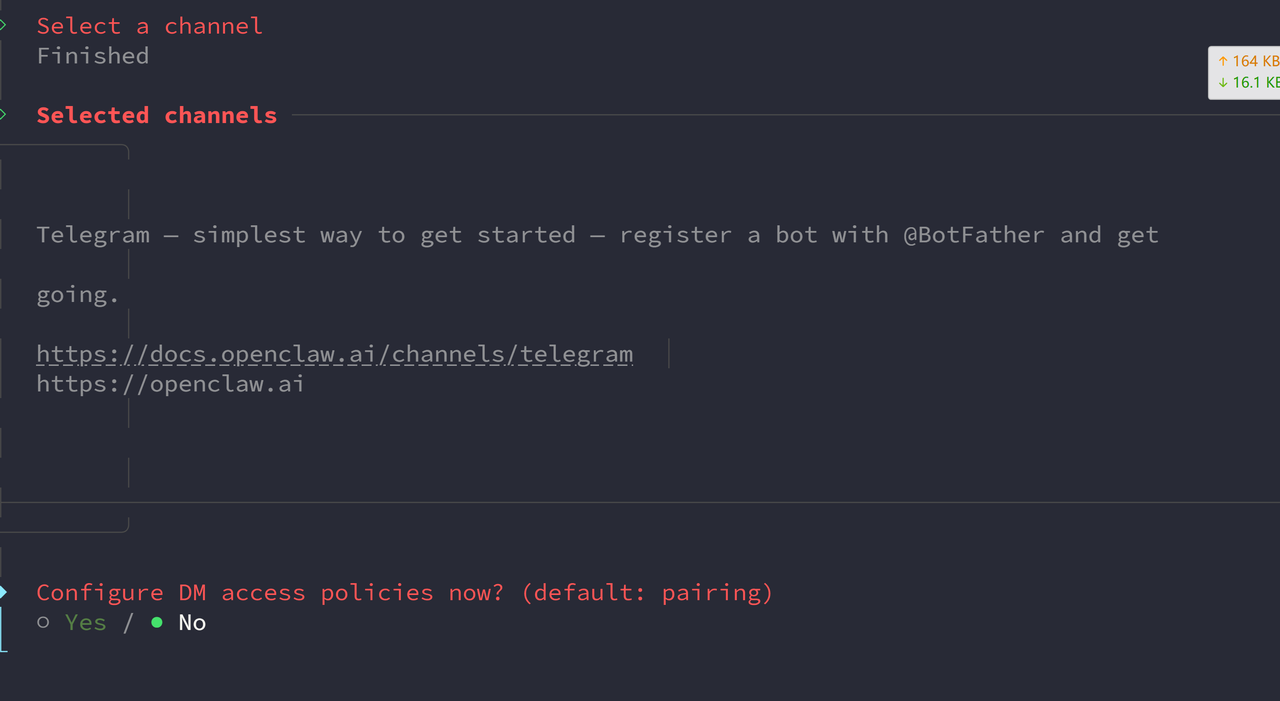
In Telegram DM policy, select Pairing (recommended).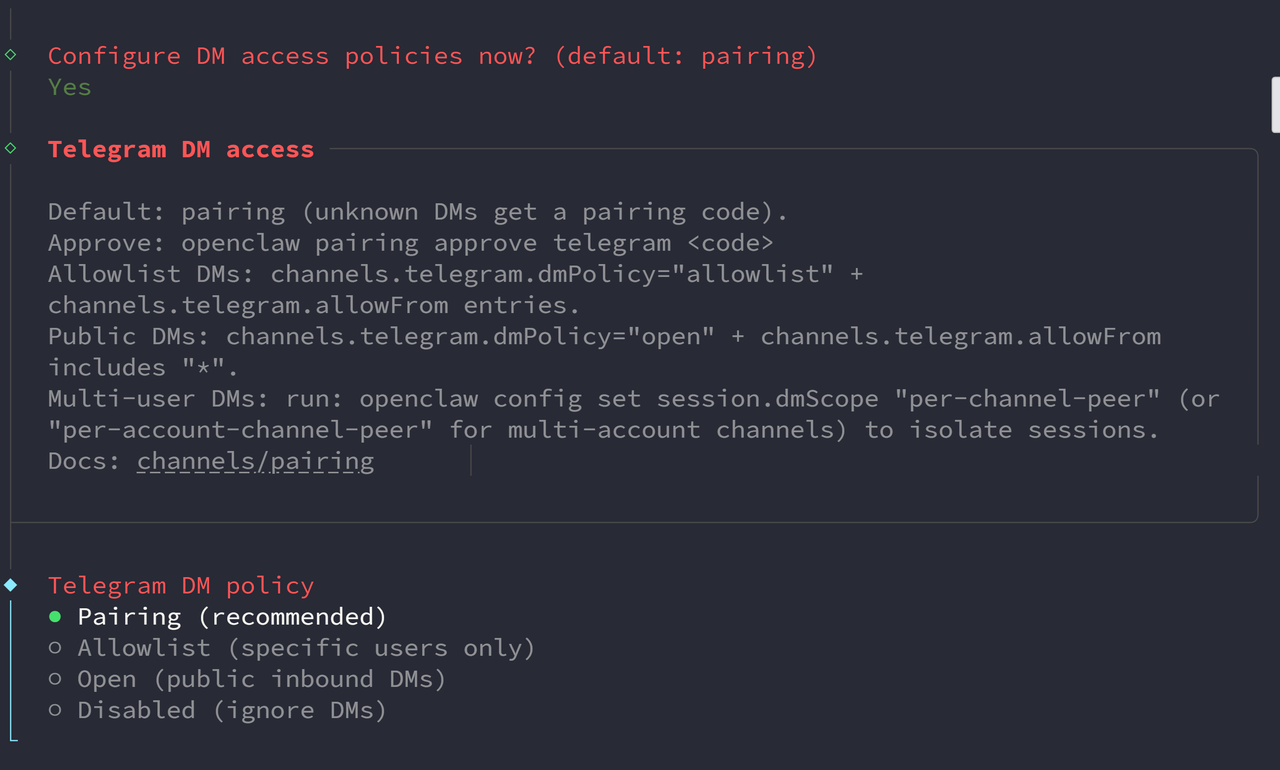
Return to Select sections to configure and choose Continue (Done) to finish the Telegram setup.
5. Complete Pairing
Open your bot’s chat in Telegram and send /start. Wait for the bot to reply with a pairing code.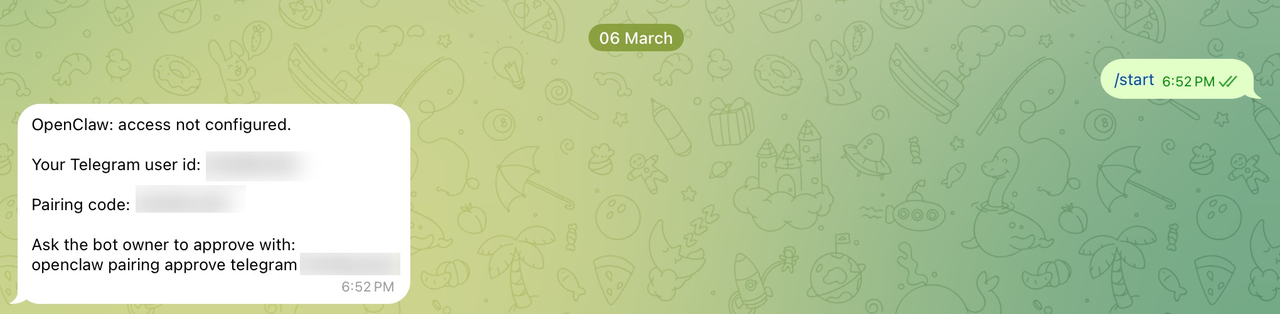
In the terminal, run the following command, replacing <your-pairing-code> with the code you received:
openclaw pairing approve telegram <your-pairing-code> |
A success message confirms that pairing is complete. You can now chat with the AI directly through your Telegram bot.
2.6 Access the Web Interface
Once configuration is complete, open a browser and navigate to:
https://<ip>:24190?token=casaos |
Replace <ip> with your device’s IP address.
After opening the Web UI for the first time, you may see a “pairing required” message on the Gateway dashboard instead of connecting directly.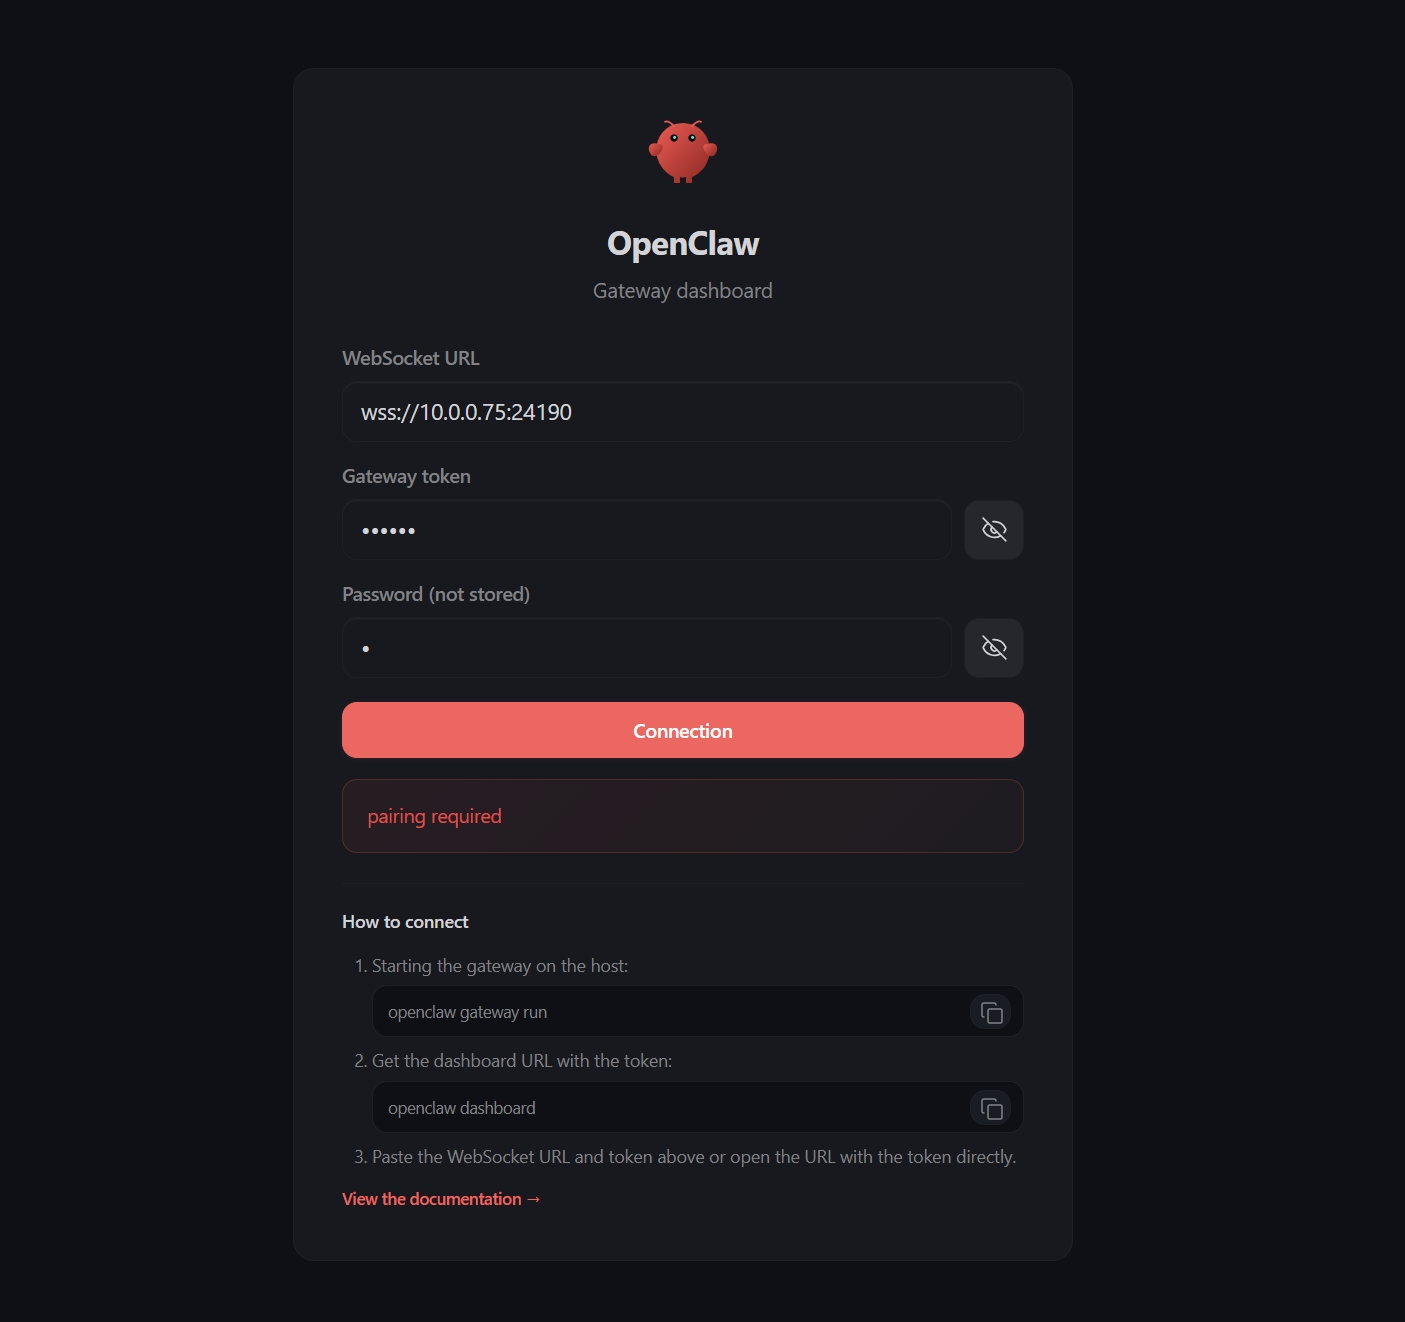
This is expected behavior in newer OpenClaw versions. The Web UI device must first be approved from inside the container.
1. Enter the OpenClaw container
Run:
docker exec -it openclaw bash |
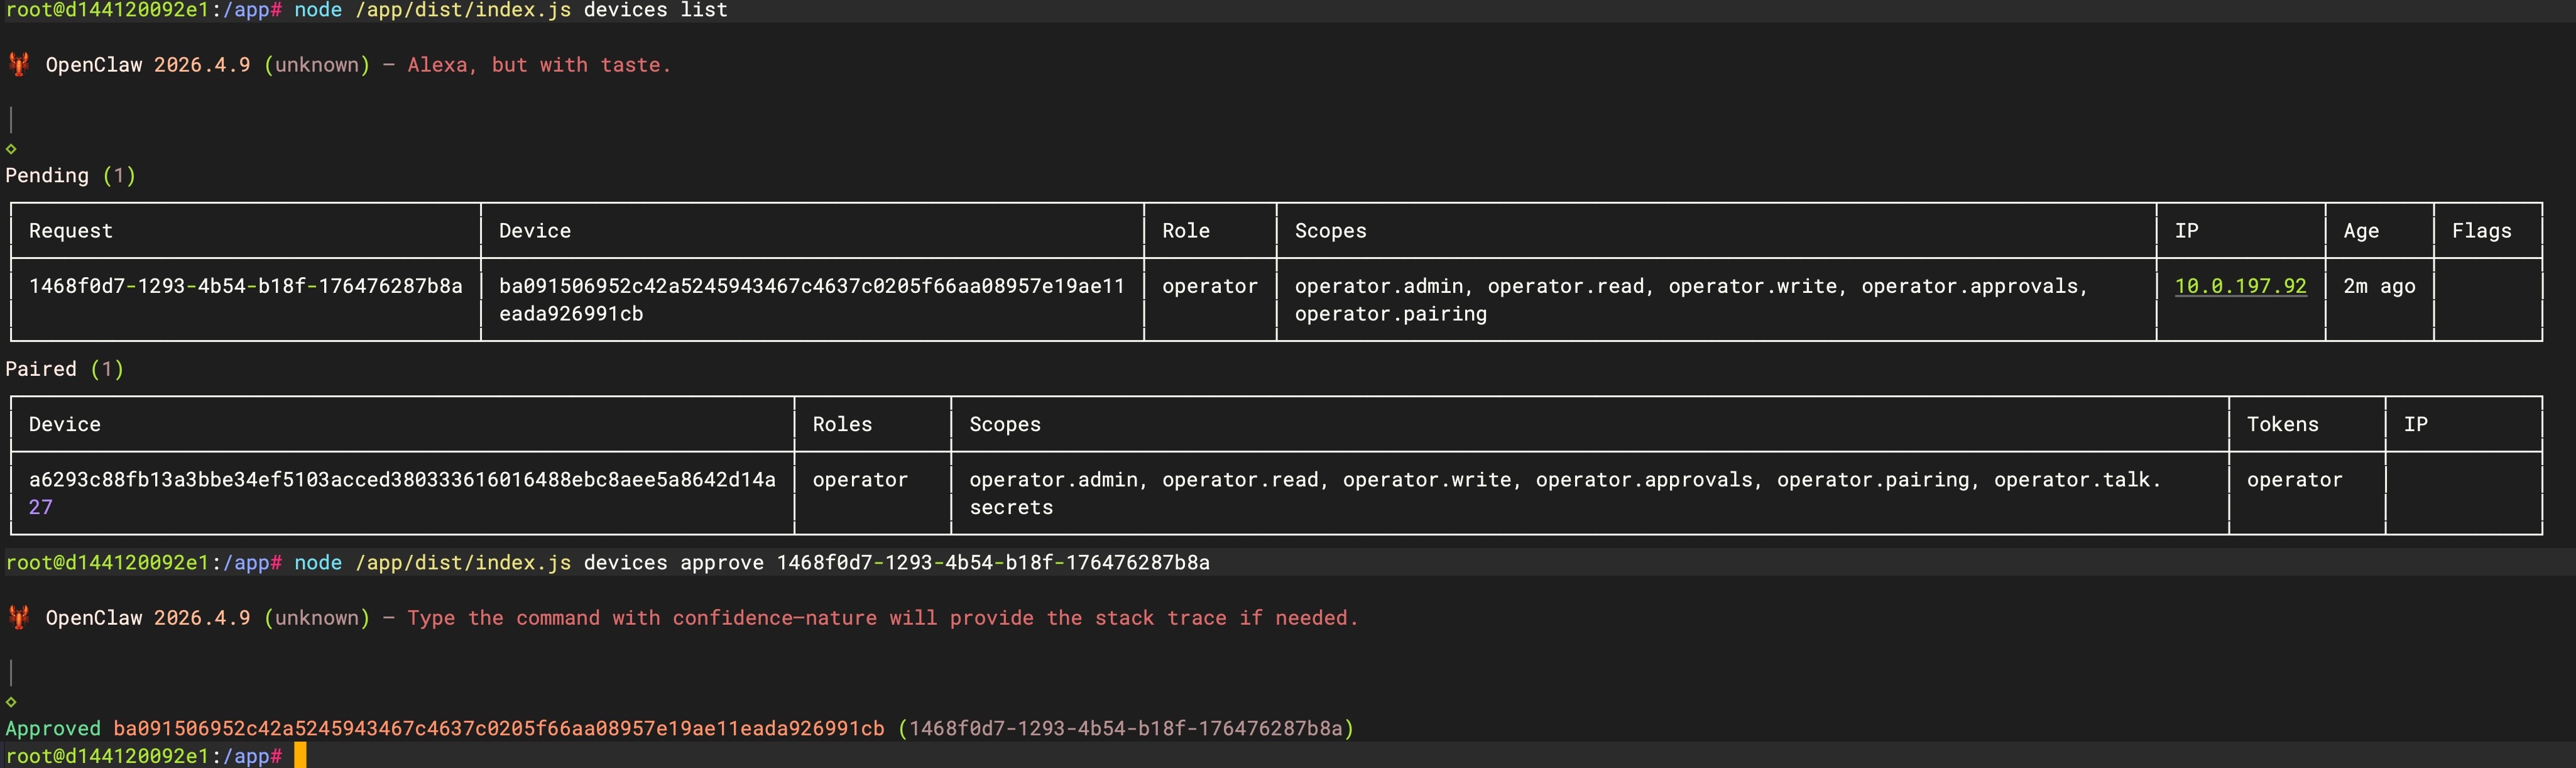
2. List pending devices
Inside the container, run:
node /app/dist/index.js devices list |
If an unpaired device exists, OpenClaw will display a request_id.
3. Approve the device
Run the following command and replace
node /app/dist/index.js devices approve <request_id> |
After approval succeeds, refresh the Web UI page and reconnect.
The “pairing required” warning should disappear, and the dashboard will connect normally.
Finally, enjoy OpenClaw!