This guide focuses on migrating from CasaOS to ZimaOS in just two simple steps. If you’re curious about a full system comparison, check out this blog – link.
Ready to upgrade from CasaOS to the more powerful ZimaOS? Don’t worry—the migration process is easier than you think! To help you plan clearly, we’ve broken the journey into three stages, and you can choose the ones that fit your needs:
- 📁 File Transfer: Like copying files on your computer, you can use LAN sharing to move your entire library from CasaOS to ZimaOS—movies, photo backups, work documents, everything. This is the most basic step. (Of course, if you only want to migrate apps, you can skip this part.)
- 🚀 App Migration: Got apps like Jellyfin or Immich fully configured? With an awesome open-source tool called CTOZ, you can migrate apps with their data and settings almost in “one click”—no need to reconfigure from scratch.
- ⚙️ Advanced Configurations: For deeply customized system settings or special containers, there’s no full automation yet. But we’ll point you to manual backup and restore paths. For most users, though, a clean setup on the new system might be the smoother choice.
Got the big picture now? Perfect—let’s dive into each step in detail and walk you through a smooth, hassle-free upgrade.
Step 1: File Data Migration (via LAN Sharing)
The most direct and efficient way to move your personal files and app data from CasaOS to ZimaOS is through LAN sharing (SMB protocol). This method requires no extra tools, is simple to operate, and ensures fast transfer speeds—perfect for migrating large files such as movies, photos, documents, and even AppData directories.
Quick migration steps:
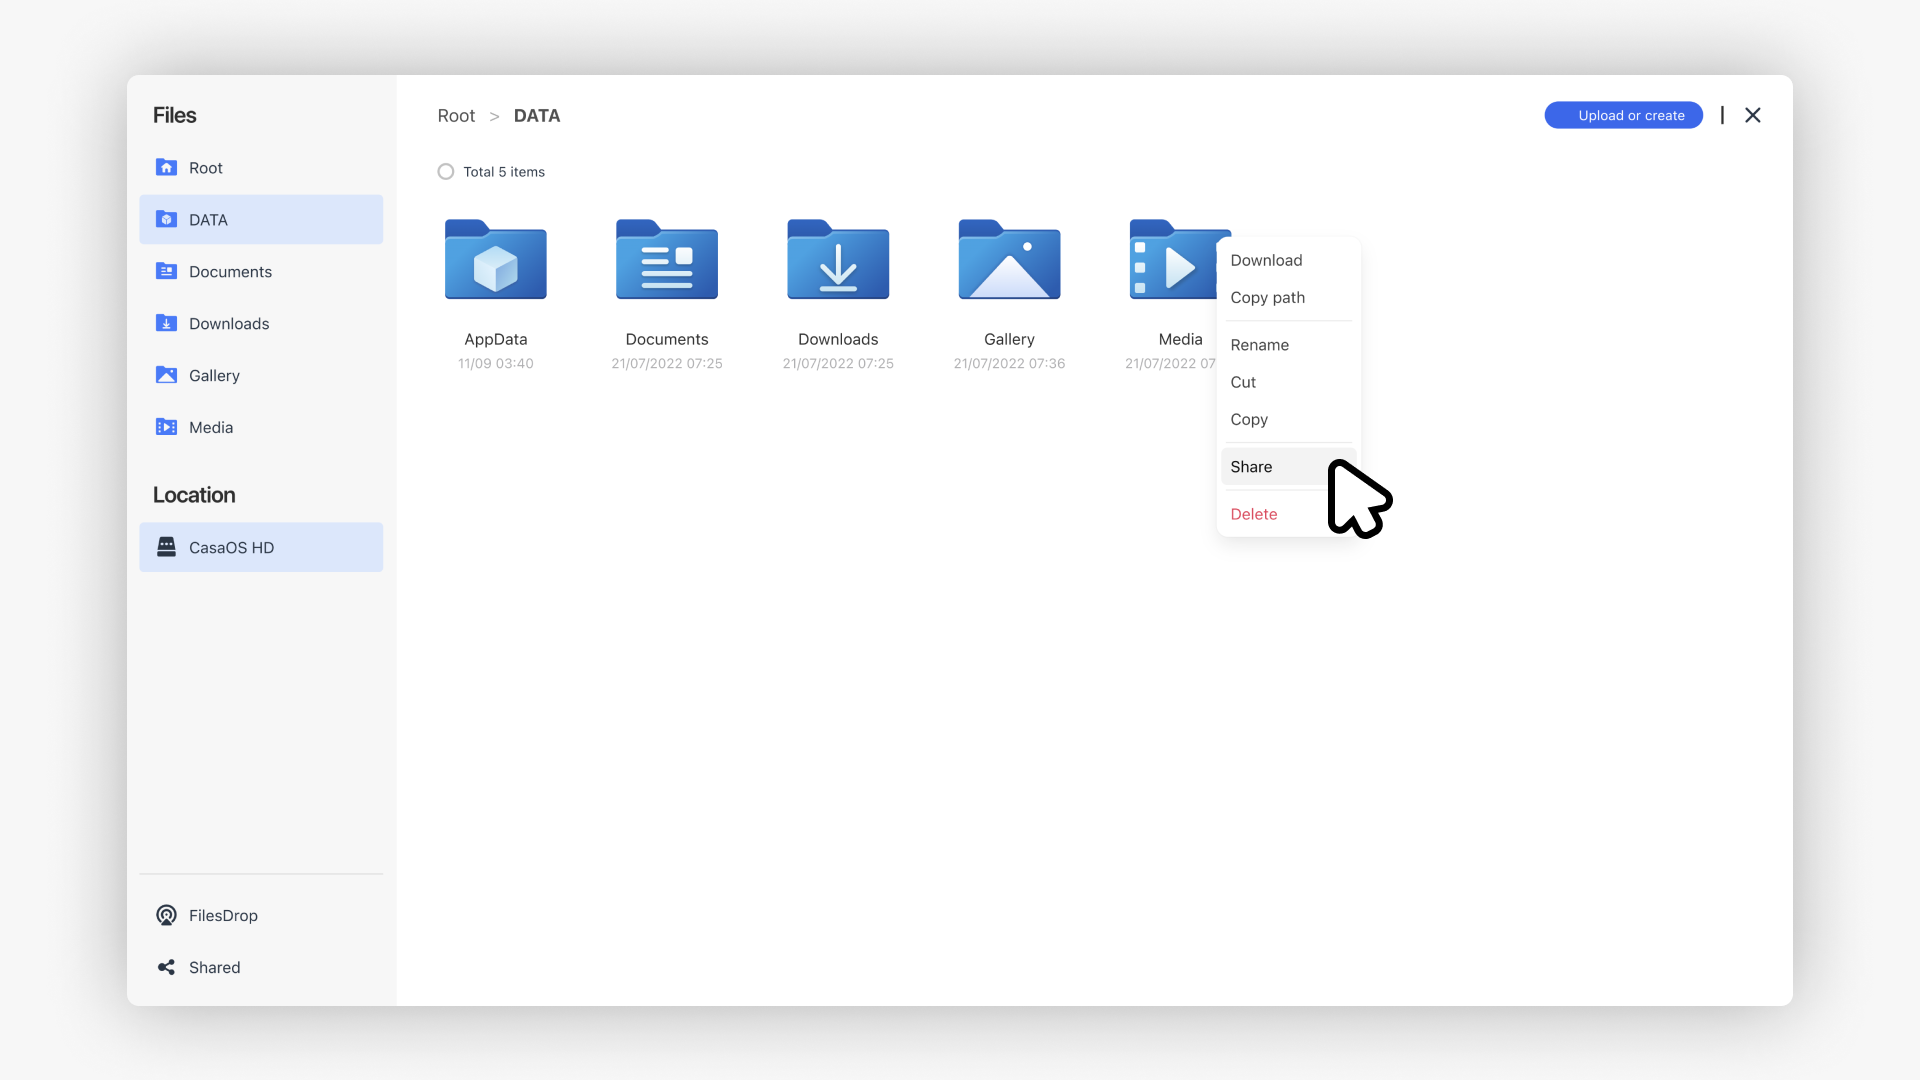
1. Enable sharing in CasaOS
Open the CasaOS file manager, select the directory you want to migrate (such as the main data storage drive or the AppData folder), set it to shared, and confirm that sharing is enabled.
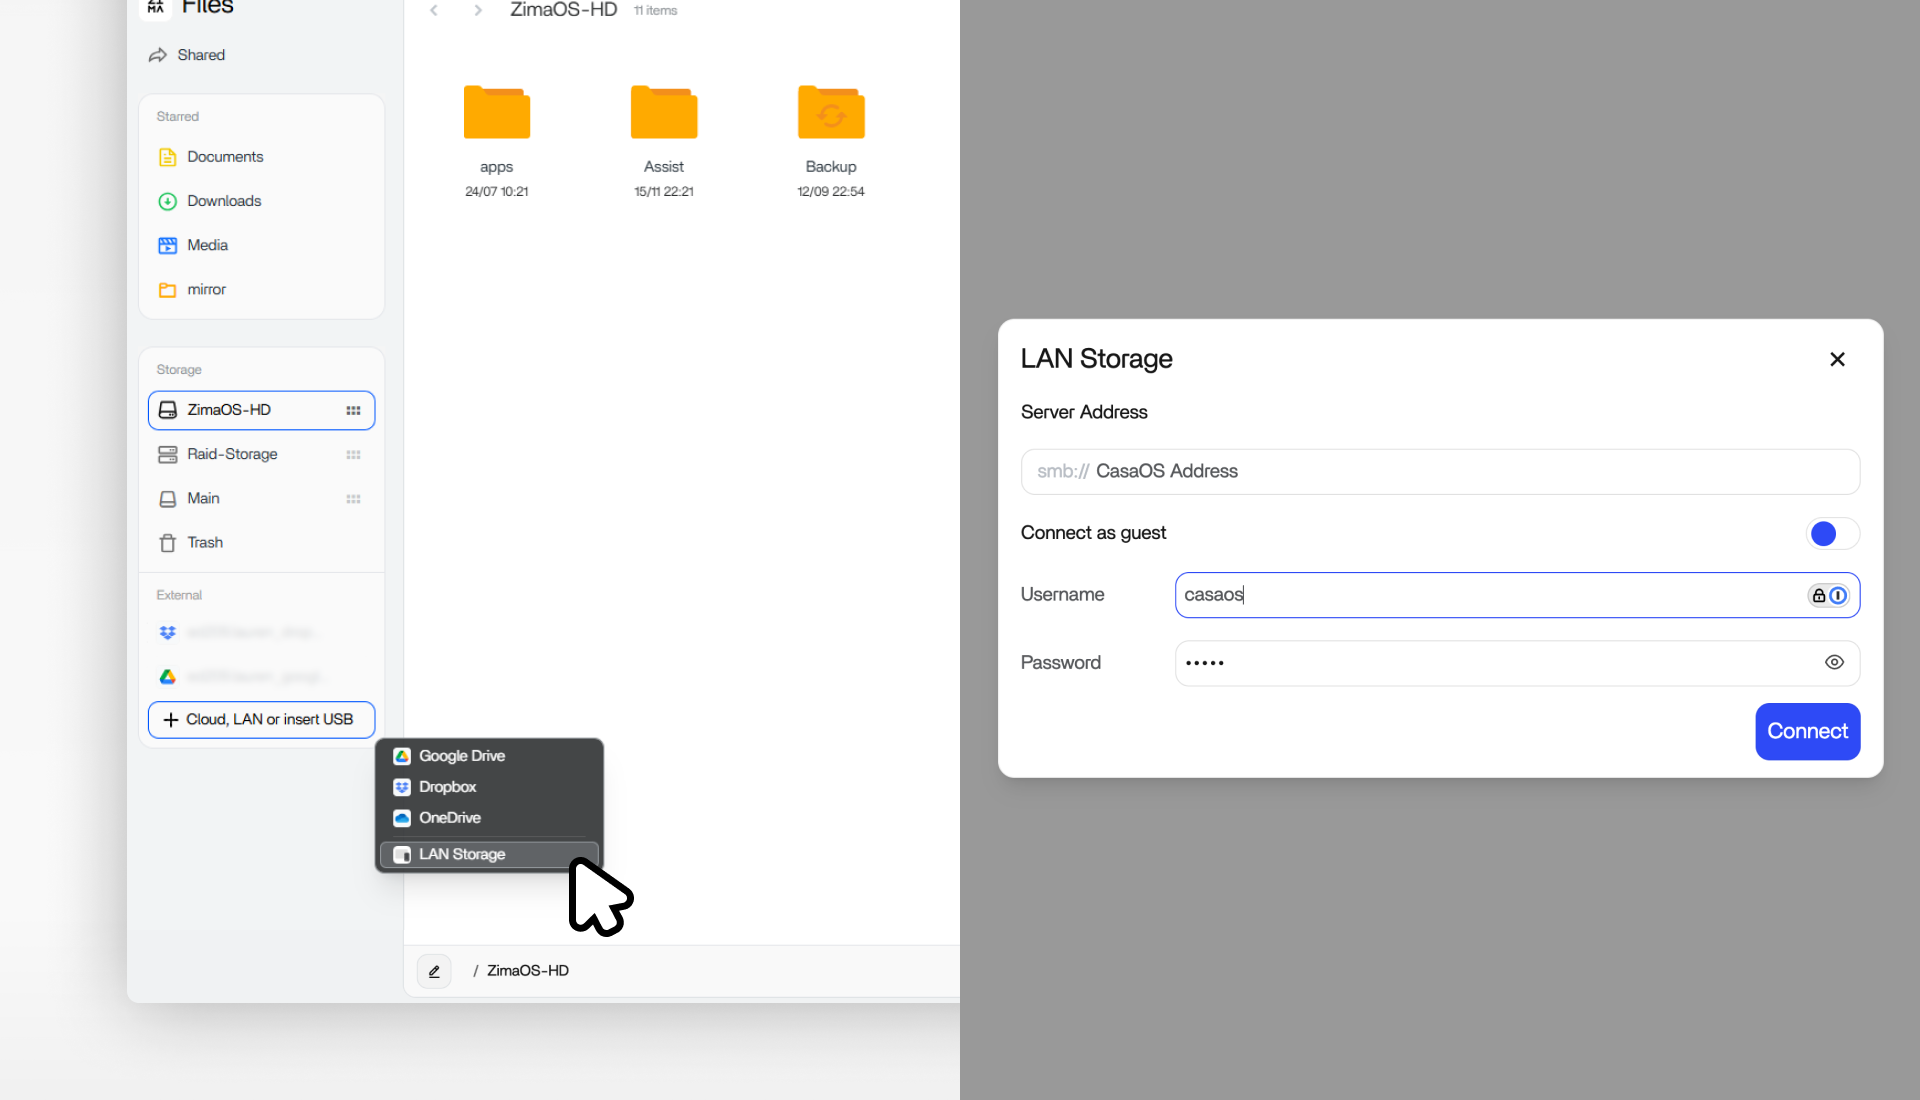
2. Connect CasaOS Shared Directory in ZimaOS Files
Make sure both devices are on the same local network. In the ZimaOS file manager, add a new network storage, enter the CasaOS IP address along with your account credentials, and connect to the shared folder.
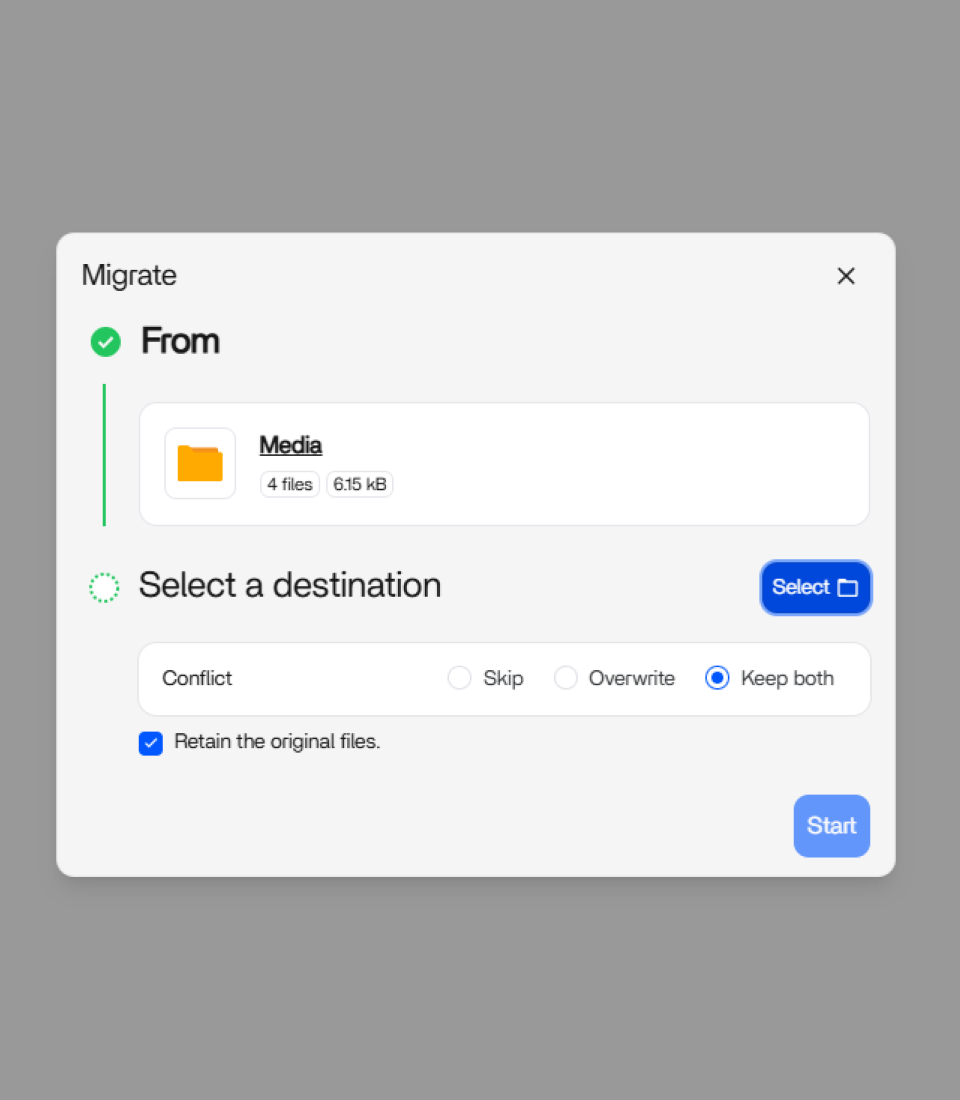
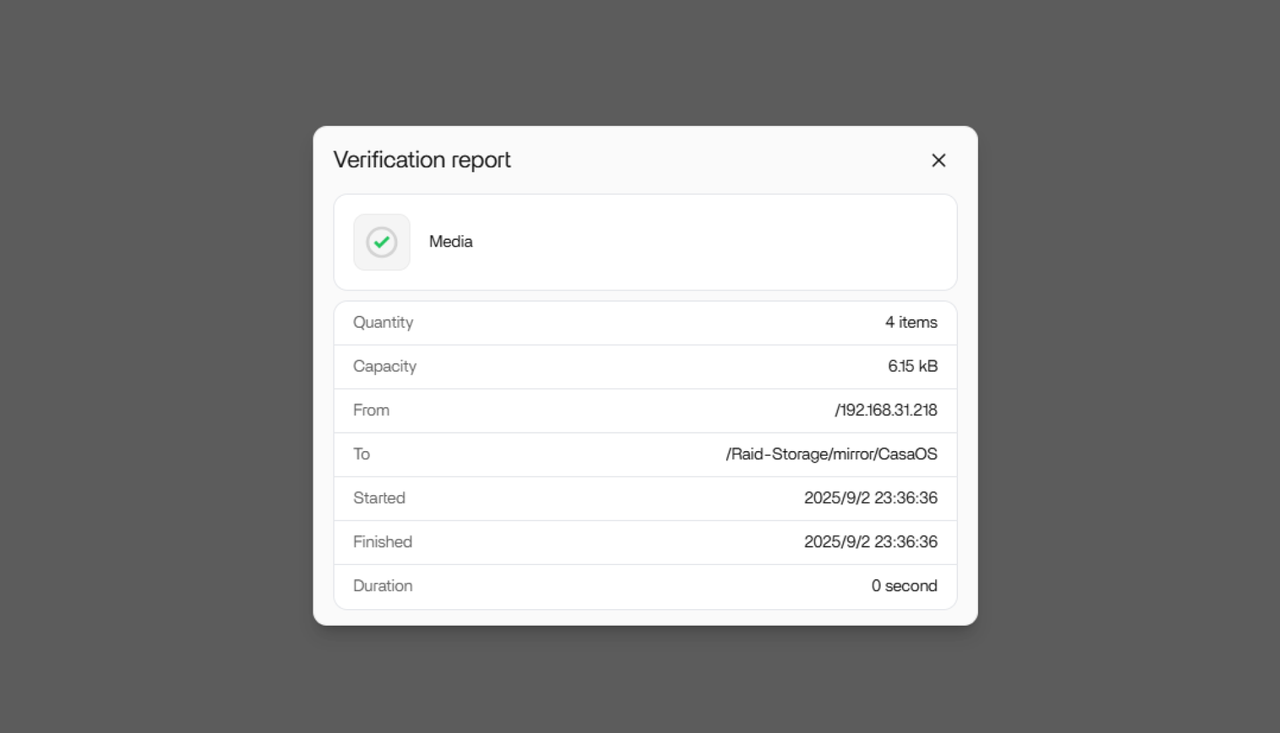
3. One-Click Migrate or Backup to ZimaOS
In ZimaOS Files, use the Migrate function or the built-in Backup feature to transfer or back up the shared folders from CasaOS directly into ZimaOS.

|
|
|
|
💡 Even better—this method isn’t limited to CasaOS!
Your TrueNAS, Unraid, Synology DSM, or even macOS folders shared via SMB can all be recognized and mounted by ZimaOS. This means whether you’re performing cross-system backups of important data or consolidating files from multiple devices, ZimaOS makes the process reliable and straightforward.
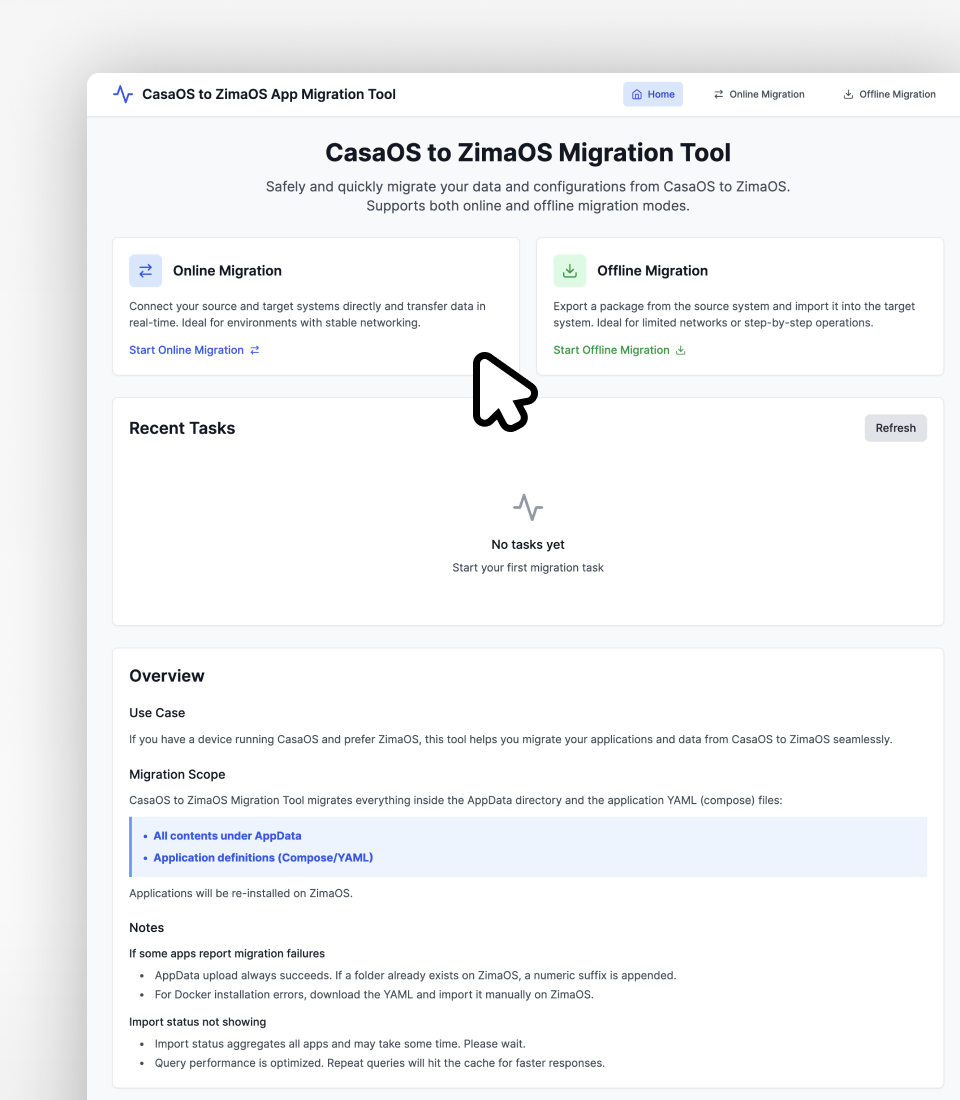
Step 2: Migrating CasaOS Apps to ZimaOS (the CTOZ One-Click Migration Tool)
Once your files are transferred, the next step is to reinstall and configure your app containers on ZimaOS. To simplify this process, the community has developed the open-source CTOZ migration tool (short for CasaOS to ZimaOS), which automates one-click migration of app data and configurations.
The CTOZ tool covers both app configuration and data migration—including everything under CasaOS’s AppData directory and the corresponding Docker Compose (YAML) files. After migration, CTOZ automatically reinstalls the apps on ZimaOS using those YAML files. This means most containerized apps installed via CasaOS, along with their data, can be carried over and remain in the same working state.
It’s important to note: because CasaOS and ZimaOS differ in system architecture, CTOZ focuses only on migrating containers and their data, not system-level configurations (which we’ll cover in the next section).
Basic steps to use the CTOZ tool:
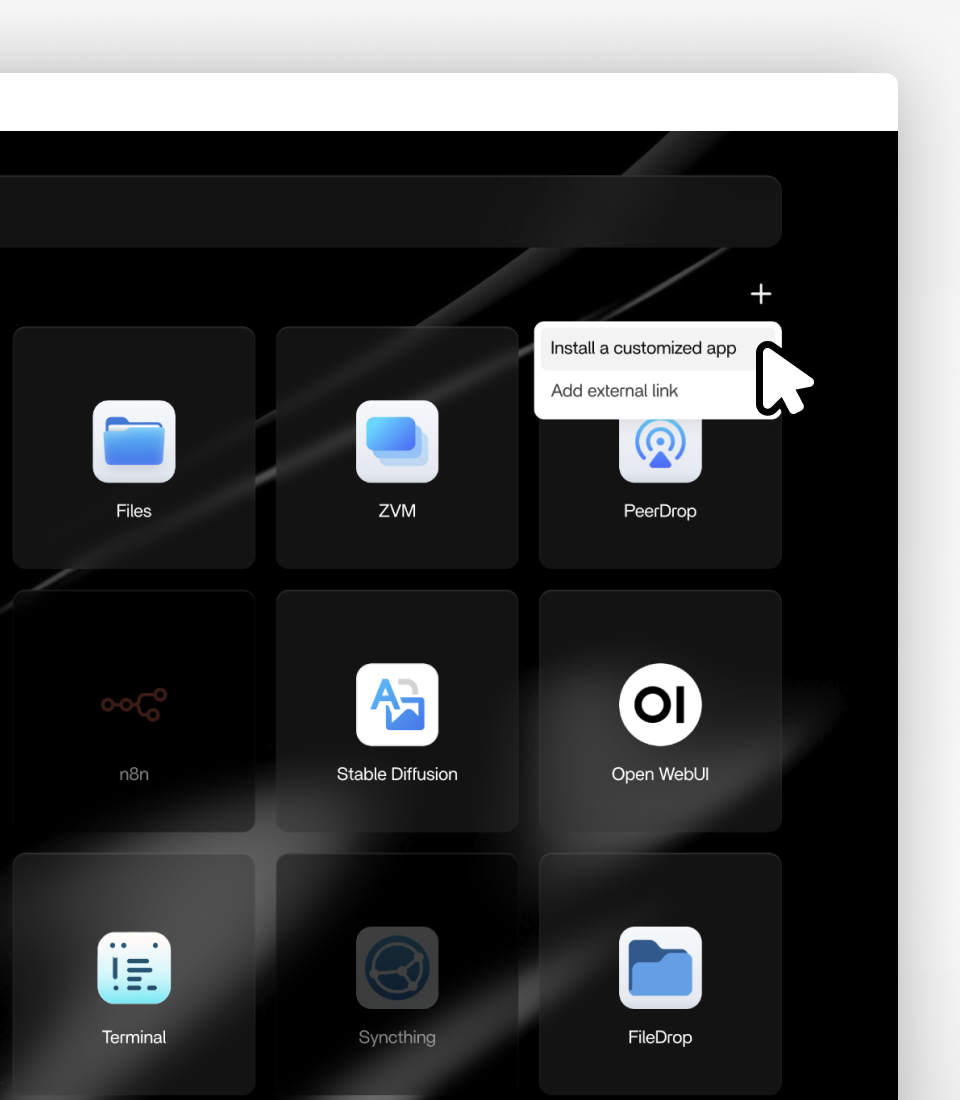
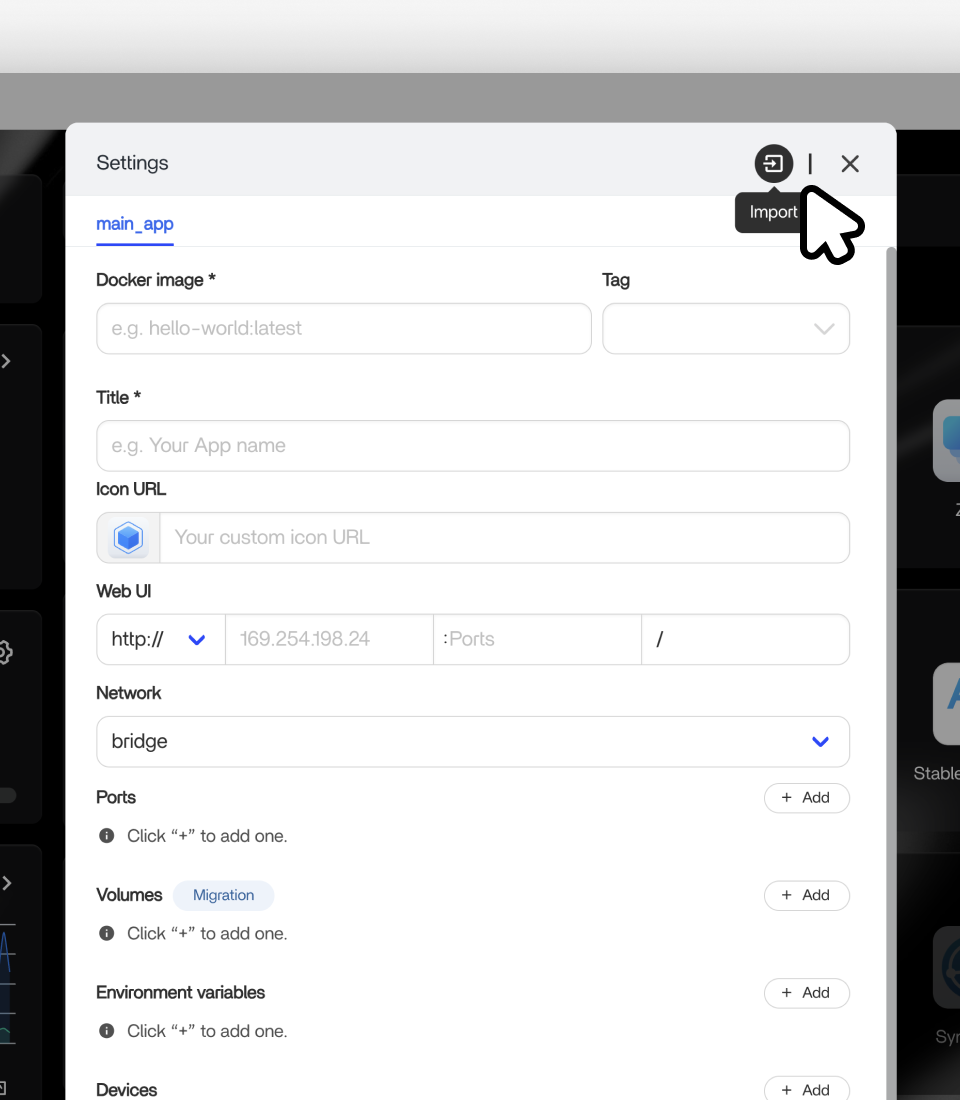
1. Download and install CTOZ – Import any Docker CLI or Docker Compose app into ZimaOS in just three steps.
|
Click Install a Customized App in the top-right corner of the App Center. |
|
Click the Import button. |
|
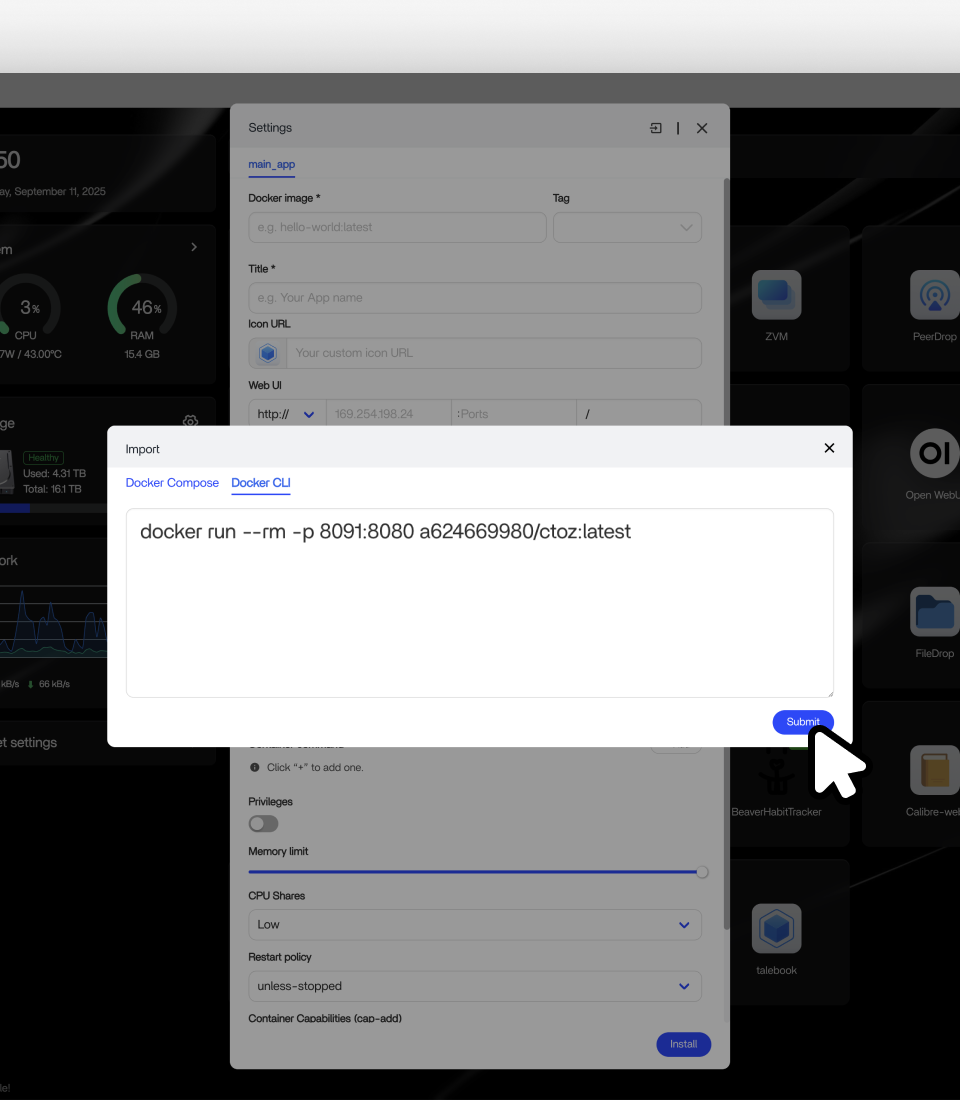
Enter the Docker CLI or Compose information from the GitHub page https://github.com/LinkLeong/ctoz, then click Submit.
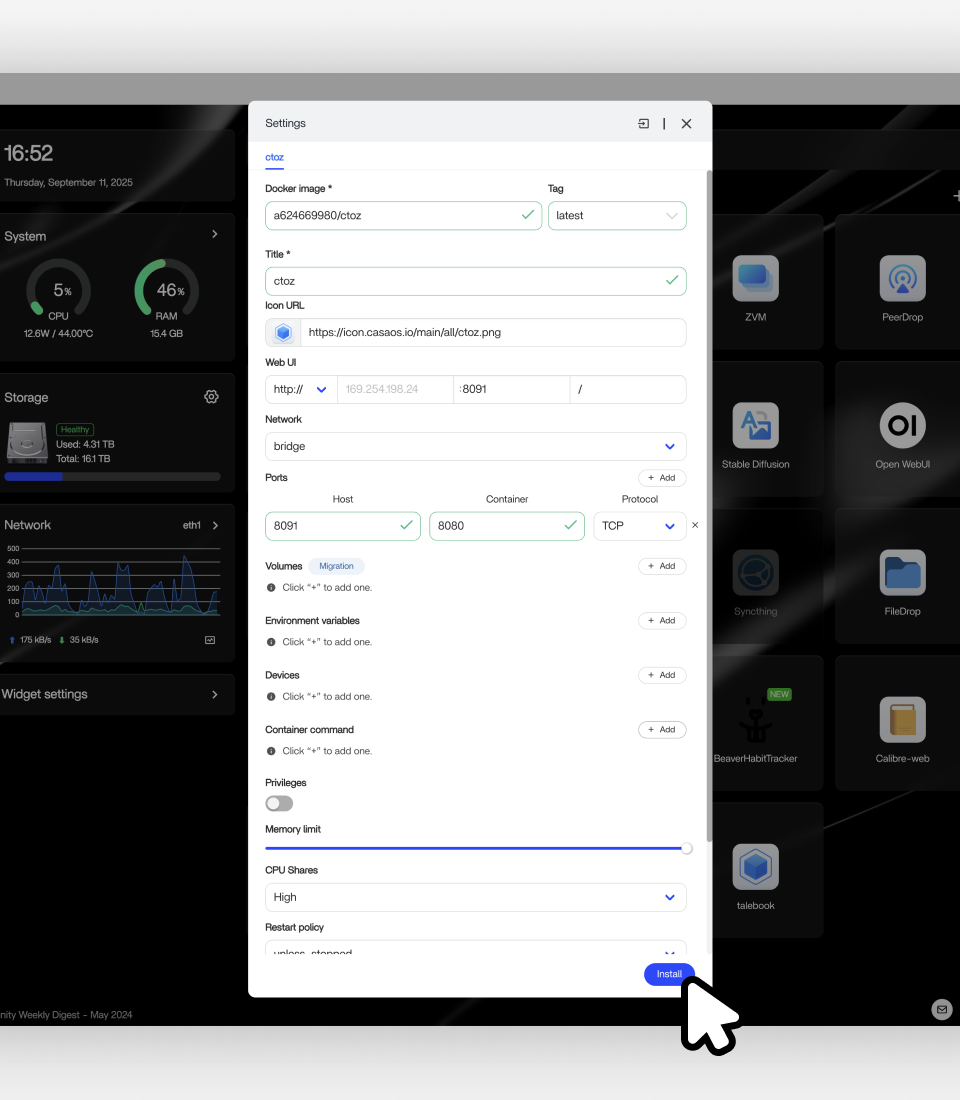
Finally, click Install and wait for the process to complete.
Note:
|
- Choose the App and Migrate
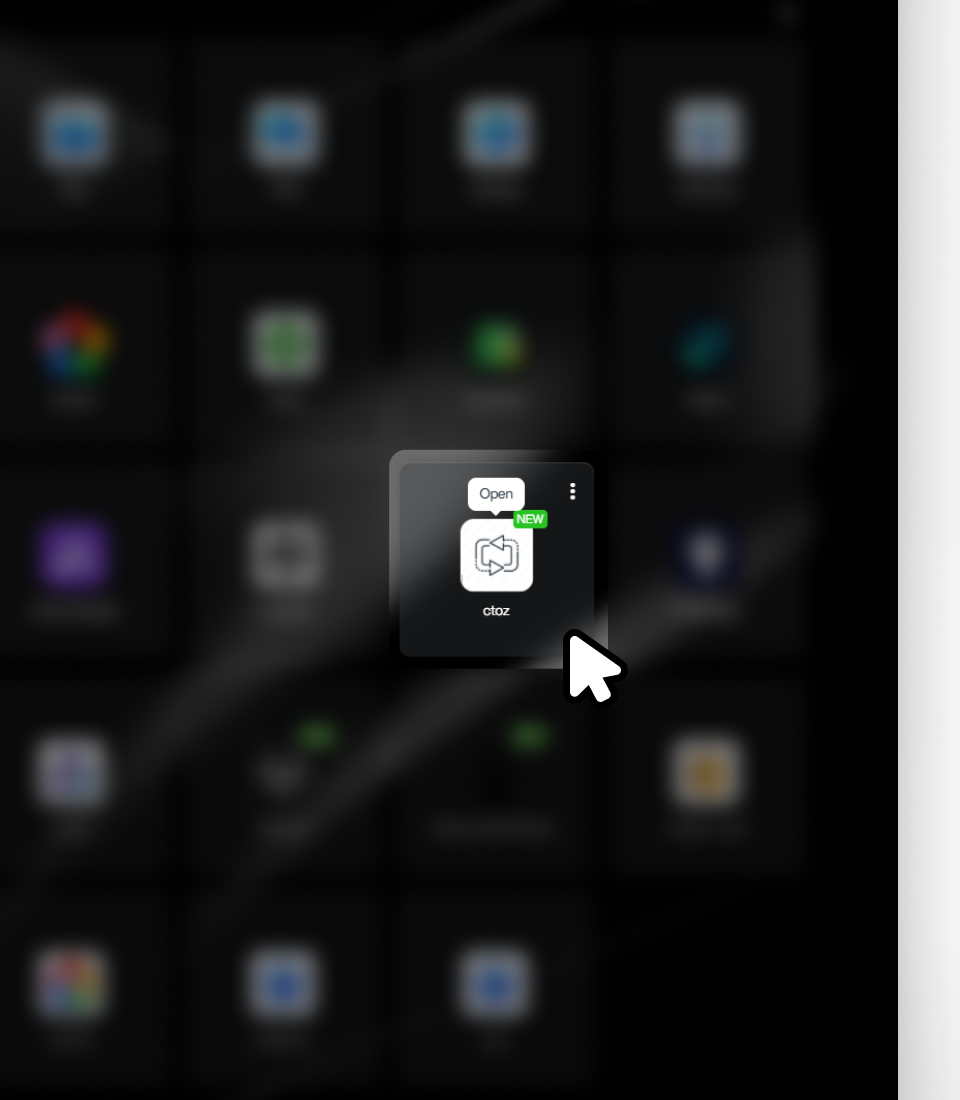
Click CTOZ
|
Choose Online Migration |
|
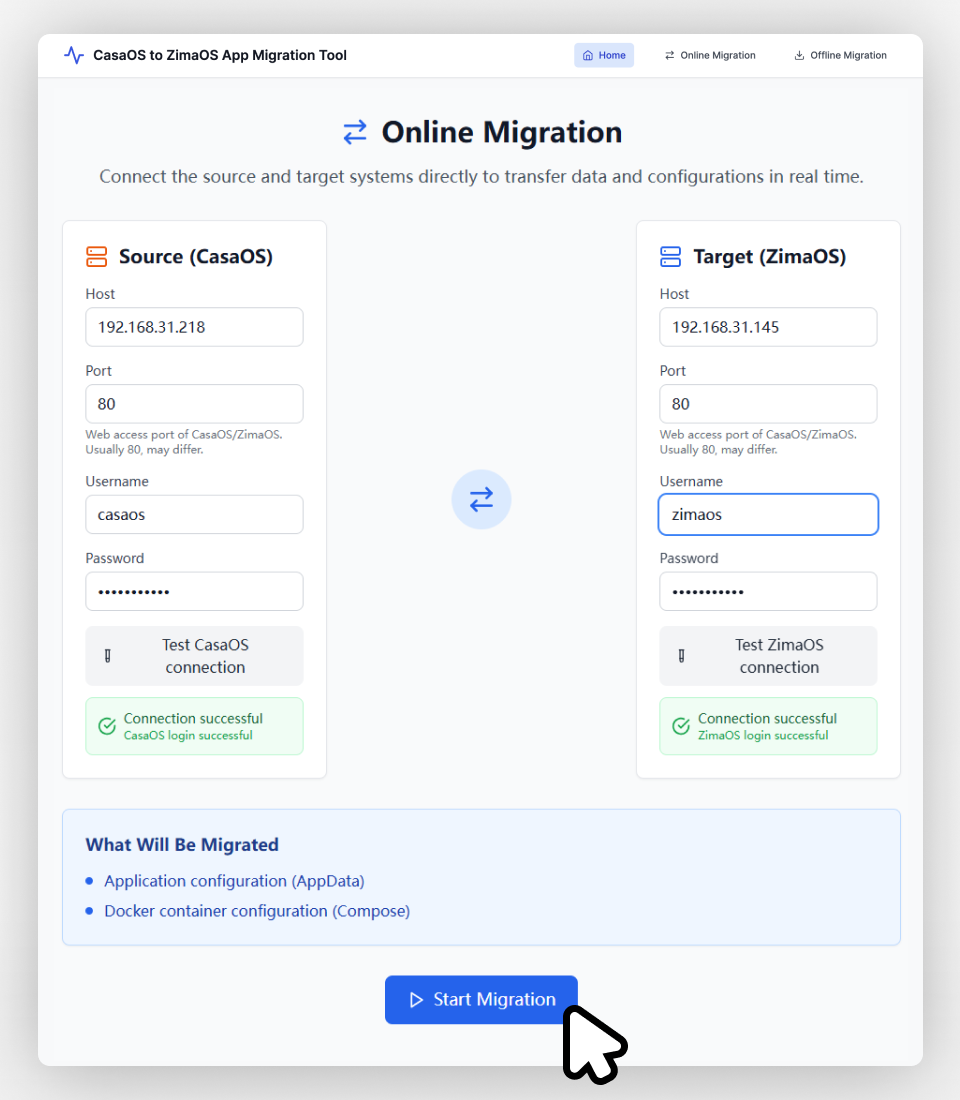
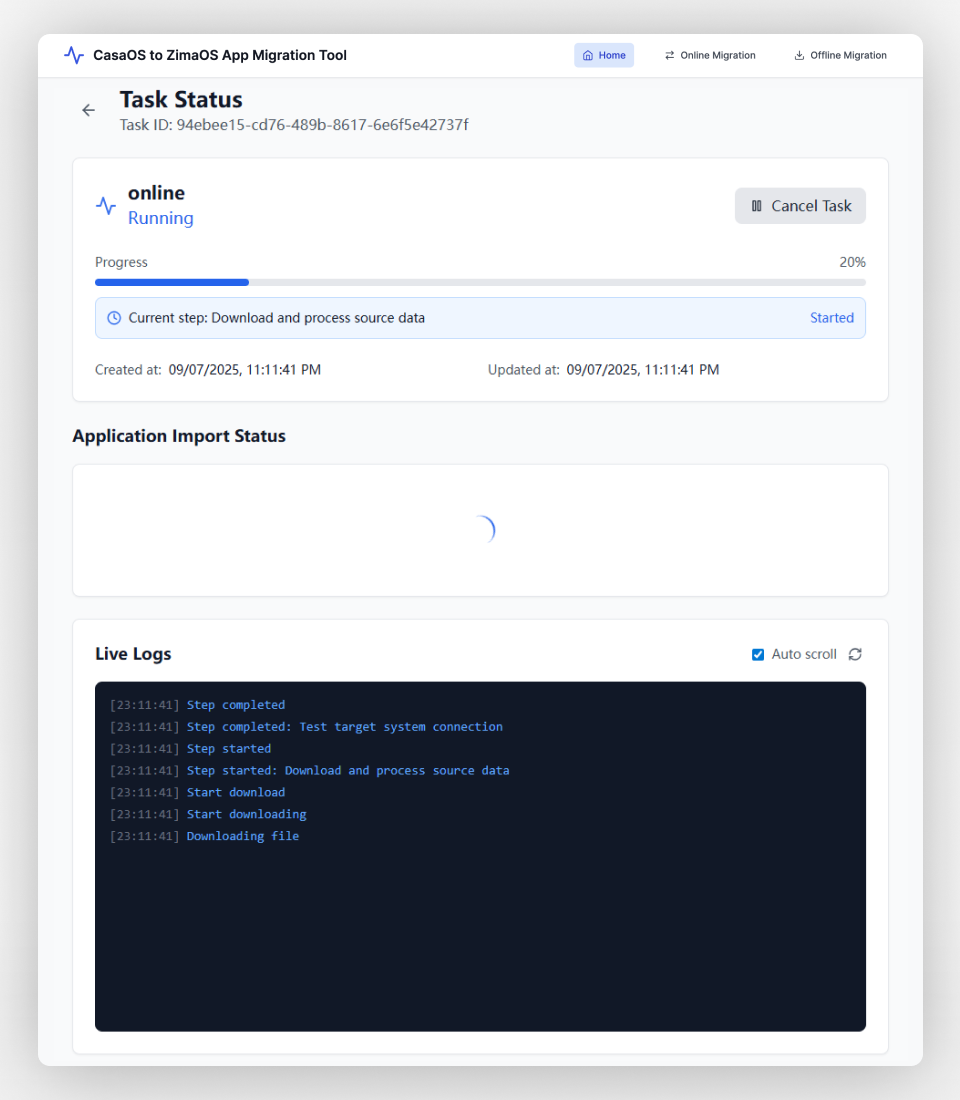
In the address bar, enter the valid LAN addresses of CasaOS and ZimaOS. Enter your account credentials, then click Start Migration. The Task Manager will display the real-time status of app migration, and the Network Widget in the OS will also show the transfer progress of both app data and applications. |
|
The migration task is in progress—just wait for it to complete! |
After the migration is complete, log in to the ZimaOS web interface and check the application list and settings. You should now see the migrated apps fully installed on ZimaOS. Open each app’s settings page and verify that the data paths correctly point to the migrated folders (CTOZ usually keeps paths consistent, but you can adjust manually if needed). Then start the apps and confirm their performance and data integrity. In most cases, your apps will run seamlessly on ZimaOS—as if nothing changed.
Notes on Using the CTOZ Tool
- Handling Migration Failures:
Even if an app migration fails, the AppData files are always transferred successfully. If the target ZimaOS already has a folder with the same name, CTOZ will append a number to the new folder name to avoid overwriting. For the Docker installation part, if CTOZ cannot complete it automatically, you can manually use the exported Docker Compose YAML and load it into ZimaOS through the “Manual Import” option in the App Store. In short: your data is safe, you may just need to reinstall the container manually. - Delayed App Import Status:
In the ZimaOS frontend, app installation/import status may not refresh immediately. After migration, CTOZ queries the status of all apps, which can take some time. If you don’t see changes right away, wait a bit and refresh. Confirm that the apps are actually running before proceeding further. - Ensure CasaOS Version Compatibility:
As mentioned earlier, CasaOS must be ≥ 0.4.4 to work properly with CTOZ. This is because newer versions of CasaOS use standardized Docker Compose configurations, which the tool depends on. If your CasaOS version is outdated, upgrade first to avoid migration issues.
With the CTOZ tool, most Docker app migrations become simple and efficient. In online mode, it’s nearly a one-click migration; in offline or standalone setups, the export/import feature saves you from manually moving files and configs. For the average user, once you’ve completed these two steps, both your files and apps are fully migrated to ZimaOS.
Other System Configurations and Data to Check
Beyond files and app data, you may have system configurations or special container data that matter to you. These currently require manual migration or reconfiguration:
- System and user settings: Because CasaOS and ZimaOS differ at the system level (e.g., user accounts, network configuration, storage mounts, sharing settings), these do not migrate automatically. We recommend reconfiguring them manually in ZimaOS.
- Non-standard containers: If you’ve deployed Docker containers outside the CasaOS App Store (for example, via CLI), the CTOZ tool cannot migrate them. In such cases, manually back up and restore the data: locate the container’s data volumes or AppData directory on CasaOS, copy them via file sharing or an external drive, then redeploy the container or image on ZimaOS and reattach the volumes. Since ZimaOS is also Docker-based, you can use the same Docker commands or Compose files. Just ensure configuration (ports, volume paths, etc.) matches the old environment so the data can be read correctly.
This type of migration is considered advanced. Most users won’t need it, since ZimaOS works out-of-the-box and often provides a cleaner setup than manual tweaks in CasaOS.
Conclusion: Migration Difficulty and Community Outlook
With files, apps, and configurations covered, this guide outlines a complete migration path from CasaOS to ZimaOS. The first two categories—files and app containers—are straightforward. Using ZimaOS Files (LAN sharing + migration) and the community-developed CTOZ tool, most users can transfer their key data and services with ease. Other configuration checks are more complex but optional; in many cases, reconfiguring directly in ZimaOS is simpler. Overall, migration from CasaOS to ZimaOS is smooth and achievable in most scenarios.
If you encounter issues during migration or have suggestions, we encourage you to join the official community forums or Discord to connect with the development team and experienced users. Developers are also welcome to contribute—whether by improving migration tools or expanding the ZimaOS ecosystem.